Monday, December 28, 2009

Fresh Baked Biscuits

My mother used to make breakfast on Christmas morning. Most of my memories include a strata or quiche. Something that could be put together the night before, and tossed in the oven to cook while we opened presents.

My husband doesn't like eggs. He cooks for me about 364 days a year. This year I wanted to take care of breakfast on Christmas.

I was browsing Smitten Kitchen a week before Christmas, just poking around to see if there were any recipes I wanted to try. The stars must have aligned in my favor, because I found a simple biscuit recipe. My husband, you see, had recently mentioned that he wanted biscuits.

The recipe called for all of five ingredients and allowed for your biscuit dough to be frozen until use. Perfect!

I made my biscuits on Christmas Eve, and popped them into the freezer overnight. Christmas morning, when we were ready, I buttered the tops and cooked them in the oven. Viola! Delicious, fresh, mouth watering biscuits.

These were so easy, I'd be foolish not to make them again. Besides, I'm pretty sure my husband won't argue.

Friday, December 18, 2009

Screen Printed Shirts

I love the holidays. Which, I am sure, comes as a suprise to those of you who read this blog.

I love giving gifts, I love making gifts, and of course receiving them. Of all the gifts I give and receive, some of my favorites are those that are handmade. Don't get me wrong, a good iTunes gift card makes me smile (and usually dance later on)- but there's something about a homemade gift that's just extra special.

This year I'm trying to make things for my close friends and family, in addition to things from their wish lists. It's been a lot of fun, and I haven't seen any of their reactions yet- but I'll be sure to share some photos after the holidays.

Way back over the summer, I spoke with my friend Christyn of BeadUp about doing a trade of sorts. She works in beads (which you probably know, as this isn't the first time I've recommended that you check out her blog) and I was in search of some unique jewelry for a wedding I was in. We settled on a trade: two pairs of earrings, a necklace, and a bracelet for some screen printed t-shirts (from me). I was expecting to churn out a few BeadUp! shirts for the lovely lady.

More recently I received an email from Christyn saying that she wanted to use her shirts as gifts for friends. Feeling the way I do about handmade gifts, I was beyond thrilled to accomodate her wishes. We went back and forth a little bit about her designs (and they were designed by her, 100% so I take no credit there). Mainly we were trying to settle on some designs that she liked and I felt would screen print well.

Screen printing by hand can be very tedious. Some of you may know about the freezer paper method, but I prefer to do it differently. I use a large embroidery hoop, very sheer curtain fabric, a design (printed on paper), a pencil, and some glue to create my screens. That way, I can reuse the screens with ease. It takes me a while to make a good screen, and every time you print from it the design will look a little different.

Christyn emailed me a design that said "I love cupcakes" that she wanted printed on a small pink t-shirt. She told me she was giving the shirt, as a gift, to her friend Cheryl (of Cupcakin' It Up). I've been brainstorming an idea for a similar shirt for a while, so I was excited to try this out.

The shirt in the photo above, was the result of the screen that I made. Unfortunately some of the cute details in the cupcake didn't come out as well as I had hoped. It's awfully hard to make such a detailed screen by hand- at least for me. Overall, I thought the design came through nicely.

Besides, I received a glowing email from Christyn telling me how awesome she thought the shirt was. Then, I got an even better follow up email saying that she'd given the shirt to Cheryl and she'd proceeded to wear the shirt around work for the remainder of the day. That was definitely a nice boost to my ego.

And now, I'm off to finish up some more handmade gifts for the holidays. Hope you all have a wonderful holiday season!

*Photo courtesy of Christyn, BeadUp

Thursday, December 10, 2009

Ten Things Any Baker Would Love to Unwrap this Holiday Season

Long time no post, huh? I've been doing crafty things and baking, but I've been busy and forgetful when it comes to pictures. I'm sorry. But to make it up to you and your loved ones, today I'm featuring 10 gifts any baker would love to receive this holiday season.

1. Kitchenaid Stand Mixer.

If your favorite baker doesn't already
have one of these, you will
score huge points by giving them
one. They're expensive folks, so I understand that it may not be within
your reach. If it is, and
you can't make up your mind. Ask yourself this one question, "how often does my baker need to mix things?" Because if the answer is more than once a year, this is a perfect gift. The first time I made cookies after I bought my mixer? Amazing. www.kitchenaid.com

2. Extra bowl for the Kitchenaid Stand Mixer.

If your favorite baker already has a Kitchenaid Stand Mixer then I am willing to bet they've
discovered what I have: one bowl is not enough. I can't tell you how frustrating it can be to have to stall out on a baking project because you have to wash your mixing bowl before you can whip
up frosting or the other half of your dough, or whatever it is. Another mixing bowl will solve that problem. www.kitchenaid.com

3. BeaterBlade for your Stand Mixer.

If your favorite baker is anything like me, they get annoyed by th
e fact that their mixer (and these come for other Stand Mixers, not just
Kitchenaid's) leaves ingredients along the
edges and bottoms of the bowl. This
means we have to stop the mixer, regularly, so we can scrape down the sides (and bottom) of the bowl to ensure that all of our ingredients are incorporated. This blade has spatula like pieces on every side of it that scrape the bowl as you mix. Don't believe that it actually works? Head on over to the website to check out their side by side video comparison. I promise you won't be disappointed. www.beaterblade.com


4. A Spoonula.

What's a spoonula, I can hear you asking. Well, it's just what it
sounds like. A spoon and a spatula all rolled into one. A spoonula
will really help your favorite baker scrape their mixing bowl, to ensure they get all the dough, batter, frosting, or whatever out. Good for rolling up that last cookie, filling that last cupcake liner, or eating leftover dough. The price is so nice you should buy two.

7. Rolling Pin Bands

Does your favorite baker ever use a rolling pin? Chances are, they could use a set of rolling pin bands. Sure you can live without these, but why would you want to? These bands stretch and fit
over most rolling pins- one on either end. The bands then work to ensure that your dough is an even, consistent thickness. That means your cookies should cook for roughly the same lengthe of time, and no one's going to whine about how they got the "small"
cookie. Win, win, win! www.amazon.com

6. A Silpat Mat

Is your baker constantly complaining about cookies sticking to baking sheets or having to buy more parchment paper for baking
? This is a perfect solution. Silpats are reusable, washable mats that you can use on cookie sheets or jelly roll pans in place of greasing your bakeware or using parchment paper. They may cost a little more, but they're worth the price. www.silpat.com

7. A Cookie Spatula

I know, I can hear you asking me why in the world you need a special spatula for cookies. Is this 100% necessary? No, probably not. Is it extremely useful for someone who bakes a lot of cookies? Definitely. This particular cookie spatula is made out of silicon and has saved some of my more finicky cookies from breakage. This could even be a stocking stuffer! www.crateandbarrel.com

8. A Cake Stand

If your baker doesn't really decorate cakes, you can feel free to skip this one. However, if they do- this is a great gift. This cake stand tilts and rotates, allowing you to get into all the nooks and crannies of your cake without accidentally jamming a finger into the frosting. I have one that just rotates, which is nice, but not as nice as this one. www.wilton.com

9. Off Set Spatulas
This is another instance in which I recommend buying more than one. Off set spatulas are going to make your favorite baker's life so much easier when they're frosting a cake or cupcakes- or even just filling up their piping bags. They allow you to put just enough pressure on the frosting that you can smooth the surface without pushing too hard and leaving
uneven dents. Buy them in more than one size. Small is good for cupcakes, medium for cakes, and extra large is great for filling your piping bag. www.wilton.com

10. Cupcake Courier

I don't even want to talk about how I used to transport my cupcakes. The Cupcake Courier is a lifesaver! This thing holds and transports up to 36 (3 dozen) cupcakes. You can use one tray or all three at a time. Plus, the space between trays (and the lid) is big enough so that your beautiful frosting doesn't get smushed. The trays are all dishwasher safe. Plus, it comes in three very chic colors. www.cupcakecourier.com

So, there you have it. 10 amazing gifts for the baker in your life.

Wait, what's that you say? You have a baker in your life but you're not sure if they have these tools. So, you want ideas that won't overlap with any tools they might have already? Umm. Ok, no problem. I can do that.

2 Bonus Tools that your Baker will love:

1. Hostess Aprons

Hostess aprons are about the cutest things out there. These are stylish aprons (sometimes half aprons, sometimes full aprons) that are just asking to be worn when you have company. This isn't that dirty apron you abuse when you bake- this one is a special occasion apron. It's not something most bakers would buy for themselves, but it is something that every baker would love to have. I couldn't pick just one, so I encourage you to head over to www.etsy.com and search for "hostess aprons." Etsy is a website that features handmade products ranging from aprons to soaps to cards to patterns. Support handmade items and make your baker smile.

2. Deni LED Cake Tray

Alright, this is definitely a luxury item. I found it while I was looking around for recommendations and I thought it was so clever I couldn't resist posting it. Are you always struggling to cut the right amount of slices in your cake? This is the perfect product for you! You put your cake on this tray and then use the LED input screen to tell it the number of servings desired. The LED lights around the tray will then light up, showing you exactly where to cut your cake. Viola! You have the perfect number of slices. Unnecessary? Yes. Fun? Definitely.

Happy Holidays everyone. I hope you're all baking up your favorite holiday treats.

Thursday, November 19, 2009

Doctor Coffee Sampler

I was cruising around flickr a few months back and found some amazing cross stitch, embroidery, and other stitching project photos. I think the last time I picked up a needle and floss was about six years ago when my first nephew was born. I cross stitched an entire blanket of the alphabet (complete with cute little animals/people for each letter).*

At any rate, seeing those pictures really got me inspired to cross stitch again. It helps that I'm commuting an hour (each way) to work on the train, which gives me plenty of time to work on small projects.

A very close friend of mine turned 30 in October and I wanted to give him something special and personal. Sure, I could've gone to the store and spent $30 on new CDs or a video game- but 30 is a big deal in my eyes (having just reached that milestone myself), and it deserves a special gift.

My friend is an MD and for as long as I've known him he's had an intense relationship with coffee. To the point where everyone around him notices if he hasn't had any.

I decided to use the old proverb, "An apple a day keeps the doctor away," and put a spin on it. I wanted my sampler to say "A pot of coffee a day keeps the doctor awake," and have a stitched coffee pot.

I'm sure it will surprise you to learn that no one makes a pattern for such a sampler. So, that left it to me to create my own pattern. I figured it couldn't be too tough. Boy was I wrong.

After a few missteps and many edits, I finally had my pattern ready to go. I used simple black letters for most of the phrase and a more elaborate font and blue floss for the words "coffee" and "doctor" for emphasis. The little coffee pot was modeled after the diner coffe pots I always see.

Now I'm looking forward to creating more personalized samplers for holiday gifts.

*(I was just reminded by a friend that I actually cross stitched a little Charlie Brown scene about a year or two ago.)

Thursday, November 12, 2009

Root Beer Float Cupcake

Mmm....root beer floats. Whenever summer rolls around you can bet your sweet bippy that I'm thinking about root beer floats.

This past summer I started thinking about trying to recreate that taste in cupcake form. I poked around online looking for a recipe, but the ones I found called for root beer extract. I didn't have any of that handy and I certainly couldn't find it at my local grocery store.

Then, I was lucky enough to receive a wonderful gift certificate to the online shop, Bake It Pretty for my birthday. And whaddaya know? They sell root beer extract!

Last Saturday my schedule had some free time so I got out my extract and started baking!

The recipe I used called for both root beer and the extract. The extract I had was for candy flavoring- a little goes a long way with the candy extract. Instead of using the full two teaspons of extract I used a few drops.

While making the SMBC, I also added a few drops of the extract.

These cupcakes are super moist and while they may not taste exactly like root beer floats, they certainly get the idea across.

Monday, October 19, 2009

Chocolate Cupcake Day 2009

In case you didn't know, yesterday (10/18) was National Chocolate Cupcake Day. Yum!

My weekend was fairly busy and I wasn't sure I would have time to bake anything to celebrate. Sunday morning at 9:30 I thought, 'darn it, I have to bake something!'

I grabbed my Martha Stewart Cupcake book (a gift from my fabulous friend danger kitten and her husband) and rustled through to find a recipe that sounded intruiging. The problem? I was definitely low on ingredients.

Ultimately I chose my old standby- Martha's 1-bowl chocolate cupcakes. But to spice it up, I added toffee bits into the cupcakes. Then to frost them, I chose a Dark Chocolate Frosting (from Martha as well) with some sea salt on top.

The combination of flavors was incredible. Rich, sweet, and salty all rolled in one.

I brought the cupcakes to my husband's performance to congratulate him and his castmates on a wonderful show (for a local Library Arts series). I tried to snap a picture of the cupcake on stage, but the lighting was all wrong. So, this one with the mic pack will have to do.

How did you celebrate Chocolate Cupcake Day 2009?

Wednesday, September 16, 2009

She's Expecting


She's Expecting
Originally uploaded by Cup O'Cake Designs
My parents came up for a visit two weeks ago. My Mom called me a few days before the visit to request a card. Her boss is expecting.

Although I know my Mom's boss, I did not know her favorite color was pink. So, I opted for a gender neutral green coupled with a lovely dark gray.

I cut out the lady and her purse with my Cricut. I used a corner punch to round the corners and stamped the phrase. Once I arranged the lady and phrase on the card, it still seemed to be missing something.

Some crystal accents were the perfect finishing touches.

Congratulations N & P! I wish you the best of luck.

Monday, September 14, 2009

Craft Room Organization


Craft Room
Originally uploaded by Cup O'Cake Designs
Ever since I moved into the new house, I've been trying to find a way to be more organized with my craft space than I ever have been before. See, the thing is, the house is bigger. My craft space is bigger. So there's an even greater potential for me to end up with more craft items than I could use in a year.

I don't know about you, but I have a horrible habit of buying things at craft stores on impulse, and then completely forgetting they're in my "stash." I am in the midst of a self imposed "paper ban" because of how much paper I have. (I do allow myself to purchase paper for specific projects- only things that require multiples of the same color/patterned paper: ie. invitations)

Clearly, I am an "out of sight, out of mind" kind of crafter.

My solution? To get organized, in a very visable way.

My craft room is far from complete, but I am really pleased with the progress I've made.

At the old apartment, I had a steel storage unit, consisting of eight drawers per side (two of those, per side), with an opening in the middle. The unit also had a top "shelf." I got it from Ikea, and it served me pretty well.

The new house, having a larger space for my crafts (which is a shared space for our office and music room), needed something more. I have a great work space (again, from Ikea) that's deep enough to be the home for my sewing machine, Cricut, and Cuttlebug- even when one is not in use.

My parents were visiting last weekend and wanted to go to Ikea (they were in search of a bed frame for their guest room). I was more than happy to accompany them. While wandering around the showroom, I came across the 
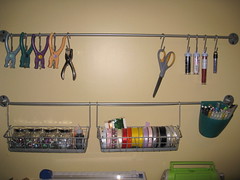
Bygel rail system. A-ha! Perfect.

I picked up one Bygel rail, two baskets, one package of s-hooks, one package of spice jars, and one bygel plastic cup. All for under $20. When I arrived home, eager to brag to my husband about my finds, he reminded me that we had an extra rail from the old apartment (we used to house kitchen items hanging from the rail).

On Saturday, I had my husband hang the rails above my craft desk. Then I went about the task of deciding what was important enough to warrant space on the rail.

Each spice jar holds a different type of embellishement (brads, eyelets, buttons, google eyes), the second basket holds ribbons (with seldom used christmas and animal print ribbons in another storage space), and the cup on the end holds pens, pencils, and glue. The top rail holds hole punches (shaped and regular), scissors, glitter, and beads from s-hooks.

The space is far from done, but it makes me excited about crafting. I already have plans on a few more things to pick up at Ikea, including more s-hooks. Eventually we hope to pain the room (a nice slate gray color, we're not too into the beige/yellow feel right now), and I plan to use orange as an accent color (for a trash can, clock, etc).

Who knew Ikea could revolutionize my craft space?

Tuesday, September 01, 2009

Cupcake Congratulations

I haven't been making or blogging my papercrafts as much as I'd like as of late. So, I'm working on correcting that.

A friend of mine recently got engaged. I wanted to send her a card because it's what I do, but also because I remember how much I enjoyed the handful of engagement cards I received (hard to believe that was four years ago now).

My friend is an avid cupcake lover. I know that no matter what, I can't go wrong if her gifts/cards have cupcakes involved.

I used my Cricut to cut out the cupcake, and the shapes for the engagement ring. Instead of topping the cupcake with sprinkles or a cherry, I used the engagement ring.

The cupcake ribbon is from Michael's (I think the dollar bin a while back, it has a little sparkle to it). Then I used gel pens to decorate the engagement ring and to write the "congrats!" sentiment.

I'm really pleased with the way this card came out. It's simple and sweet, and I think it works well for the occasion.

Monday, August 31, 2009

Bakeover with Danger Kitten


Cheese Crackers
Originally uploaded by Cup O'Cake Designs
Life has been hectic for me this summer, I know I've mentioned that before. I've been very careful to leave time for baking because if I go too long without it, I start to feel like I'll never pick it back up again.

About a week ago, my husband made plans to attend a Beer Festival with Danger Kitten's husband, Brewfus. Danger Kitten & I had zero desire to attend said festival, but I thought a bakeover would be a great idea. I'd been wanting to get together with her for a while now that she's moved back to the state, but hadn't had the opportunity.

While the boys went off to taste who knows how many Belgian Ales, we baked our little hearts out. And it was fantastic.

I made Cheese Crackers, two ways. First I made them as called for in the recipe- with two cups of Cheddar Cheese. However, I love a little spice to my cheese, so for my second batch I used a Chipotle Cheese.

In the future, I think I'll roll the dough much thinner, because I prefer a crispy cracker. These were delicious, but a little soft for my tastes. The Chipotle crackers were addictive, and the Cheddar crackers were quite yummy as well.

Danger Kitten baked Black Bottom Cupcakes and Raspberry Lemon Thumbprints. I didn't have a chance to eat either fresh out of the oven- but they were both delicious. I had a hard time keeping myself from eating too much of the cookie dough. The addition of lemon (juice & zest) made them the perfect summer afternoon treat.

We also had our friend Linda along. She baked some wonderful peanut butter chocolate brownies. Mmm.

I had so much fun doing this, that I'm hoping we can make it a monthly event.

Looking to get out of a baking rut? Looking for an excuse to try out a recipe you keep putting off? Find some friends and host a bakeover. I promise you'll have fun.

You can see more pictures (mostly "in progress" shots) at my flickr.

Friday, August 21, 2009

Neopolitan Cupcakes

I've been itching to make Neopolitan cupcakes pretty much all summer long. I had planned to make them for a BBQ at our new house. Unfortunately, Mother Nature decided that this summer would be a mix of rain and unbareably humid thus prohibiting any comfortable BBQs (at least in our busy schedule).

Last weekend, I had a party to go to. A friend who moved across the country was in town. The perfect occasion to bust out a recpie I'd been dreaming about for months.

I tried out a new chocolate cake recipe. While the cake is delicioius, it's a bit too moist for a filled cupcake. I would definitely use this again for chocolate cupcakes, but not any filled cupcakes.

The filling is a strawberry cream, made using fresh pureed strawberries. I was a little uncertain about the cream at first. I felt you didn't get a strong enough strawberry flavoring. I shouldn't have worried. It's perfect.

The frosting is my go-to Vanilla buttercream.

The cupcake came out just right. I might try again, but with a strawberry cake and chocolate filling- because I didn't feel like the filling here was enough of a surprise (my ultimate goal).

Monday, August 17, 2009

Peanut Butter Cookies

(Sorry for the not great picture quality. I'm working on getting a photo editing program installed on my home computer.)

I've been majorly busy recently with a few close friends getting married, which has led to more time out of my house than I care to think about.

Last week, there were two birthdays at my husband's office. I have become the unofficial cupcake supplier when it comes to birthdays in his office.

For Monday's birthday celebrant, I made an old favorite: Mint Chocolate Chip Cupcakes. I had to improvise a bit and use finely ground candy canes instead of peppermint extract. Otherwise, it was a very routine day for baking.

Friday's birthday celebrant, however, was a bit more challenging. This coworker doesn't really care for cupcakes or cake. Luckily for me, by now most of my husband's office knows to expect cupcakes on their birthdays. That makes it much easier to figure out what kind of sweets to bake.

When I found out that the birthday celebrant liked peanut butter cookies, I was a little stumped. I must admit that I'm not really into peanut butter cookies. I checked around and find a nice simple recipe, with a twist. Dipping the cookies in chocolate.

I dipped half the cookies in chocolate (not knowing whether or not the birthday celebrant would want that), and then half of those went into sprinkles (for a festive look) and the other half into peanuts.

The cookies were a huge hit at the office. And, it's always nice to try something new.

Thursday, July 23, 2009

Chocolate Butterscotch Chip Cupcakes

What do you get when you have to make cupcakes for someone who is celebrating a birthday, but you have absolutely no idea what flavors they like? Apparently, in my world you get Chocolate Butterscotch Chip cupcakes with Vanilla frosting.

I'm not going to give the birthday celebrant a hard time, because I'm the same way- when someone asks me what I like, I say "Oh, I like almost anything related to desserts."

I went to the grocery store hoping inspiration would hit me. I went down the baking isle in search of baking soda (I'd run out the previous week), and BAM! There it was- butterscotch chips. Mmmm.

I didn't want to use vanilla cake, because I wanted the butterscotch to be a hidden surprise, instead of the feature for this cupcake. I used a new chocolate cake recipe (from the Better Homes & Gardens cookbook) which turned out amazingly.

After baking up the cupcakes, I decided to go with Vanilla buttercream frosting. I made a half recipe for 24 cupcakes, because I knew I was going to hand frost (as opposed to piping it on) and also because again, I didn't want the frosting to take away from the overall flavor.

They came out pretty darn well. And? The important thing: the birthday celebrant really liked them.

Sometimes going into the kitchen with no ideas does work out favorably.

Sunday, July 12, 2009

Sewing Challenges

I am currently working on a new project that involves minimal sewing. I'm really excited about it, but also feeling anxious.

Why the anxiousness, you ask. Well, this Natalie Dee cartoon pretty much sums it up.

nataliedee.com

Yeah, I'm having bobbin issues. Or maybe it's tension issues. Or something. I blame the bobbin because the thread keeps getting stuck down there.

I haven't actually sewed anything on the project for fear of destruction. So, here's keeping my fingers crossed and hoping I can do it without any hassle.

But for now, enjoy the above cartoon. I know I'll be looking at it the next time my bobbin gets messed up so that I won't feel alone in my bobbin disasters.

Wednesday, July 08, 2009

And They Lived Happily Ever After

This past weekend, I spent my 4th of July at the wedding of one of my very best friends. I got to spend five full days in my hometown, reconnecting with friends and family. It was fantastic.

Of course, having to be there a few days early for the rehearsal I had to make the wedding card over a week in advance. My creative mojo usually doesn't start working until I have about an hour to finish something, so this was a bit of a challenge.

For my inspiration I pulled out the materials I'd used to create her wedding invations (I...am trying to find the one I have so that I can show you what they looked like, but I have not yet succeeded there). Her wedding colors were black, ivory, and gold.

I decided to use the gold as the main color for the card (it doesn't photograph well, but it has a slight shimmer to it). Rooting around through my stamps I came across the stamp of the couple. It's actually got three different poses for the couple and I really adore the stamp.

I used a square motif because the wedding invitations had embossed squares on them, but incorporated the circles and squiggly lines as a way to tie in the thank you notes I made for a gift (which, I stupidly forgot to photograph).

The shapes are all cut out using my Cricut and the stamp of the couple was embellished using glitter gel pens.

Wednesday, July 01, 2009

How to Use Your Bone Folder

A few weeks back I posted about my Martha Stewart Bone Folder that I can't craft without. Immediately thereafter there was a run on Bone Folders as my legions of readers rushed out to purchase their very own MS Bone Folder.

In all seriousness, I do have a reader who bought a Bone Folder and asked me for some tips on using the new tool. I tried to explain in words how to hold the tool and what to do, but all I think I was successful at was confusing the poor person.

So, here is a short video in which I explain how I use my MS Bone Folder in the hopes that it helps you use yours.


Monday, June 29, 2009

Inspiration from NYC

Christyn, of Bead Up, does wonderful posts where she shares the inspiration behind some of her pieces. I love those posts and they make me think about where my inspiration comes from.

Truth be told, more often then not I am inspired by what materials I have on hand. Sometimes the inspiration comes from the person who'll be receiving the card or the mood that I am in. All of these things are a little difficult to showcase.

Last weekend, my husband and I took a trip into NYC to see a show and visit a museum. I've been to NYC a number of times, but it never ceases to capture my imagination. Once, on a trip, I was ruthlessly teased for whipping out my camera at every available opportunity. After my local tour guide (a friend) realized I wasn't taking the typical "tourist" pictures, he eased up.

After returning home from our trip, I was inspired by some of the things I saw there and began working on some overdue thank you cards.
While in NYC I visited FAO Schwarz. I am a Barbie collector and FAO is one of the few stores that I can actually see an upscale doll in person before making a purchase (their selection is limited, and typically a little overpriced). A silkstone doll came home with me (she just hopped in my bag, I swear I don't know how it happened), and when I took a look at the inside of the box I found inspiration to create one of my overdue thank you cards.

The card uses the same color scheme of ivory, gold, and a little black for the lettering. I used my Cricut to cut out the square shape. The phrase and gold corner details are stamped on. I went over the stamps with gel pens to enhance their look. The final touch was a little gold ribbon.
After pulling the tissue paper back to get a better look at my new doll, her swimsuit (inspired by the original Barbie's swimsuit back in 1959- yes, this is Barbie's 50th Anniversary!) was a definite inspiration. I love the simplicity of the swimsuit, and how the black and white really draw your eye.

I used the swimsuit and the turquoise pashmina I bought as inspiration for another long overdue thank you card. I used my Cuttlebug to emboss the flower design on the black paper. Then I went over the embossed design with white and turquoise gel pens. The quadrilateral shape was cut out using my Cricut. Thank you was stamped and then enhanced using my gel pens.
Hopefully, in the future I can do more posts like this, where I can share the source of my inspiration. The trick will be remembering to snap a photo of the inspiration before it's too late.
Where do you get your inspiration?

Thursday, June 25, 2009

Chocolate Chip Cookies, Now with Toffee Bits

This past Tuesday while my immediate family was enjoying the wonders of Disney World and my husband's immediate family was anxiously awaiting the arrival of a baby girl (niece to us) I got a hankering for good old chocolate chip cookies.

I know I don't often post about cookies here, and to be honest it's because outside of the holidays (I'm talking about the winter holidays here), I don't bake cookies all that frequently. I love cookies, really truly love them, but I don't bake them much.

So on Tuesday, when I got a hankering for chocolate chip cookies and mentioned it to my husband I barely had time to finish my sentence before he said "BAKE THEM!" He's always so supportive.

As I was scooping the dough onto my cookie sheets, I was thinking about how I am never ever happy with my chocolate chip cookies. Sure they taste fine, but I always feel like they look...well, flat.

In the hopes of changing my attitude about my cookies, I decided that I'd try something a little different. I ended up with three dozen cookies (and I probably could have made closer to 3.5 dozen if I hadn't left a healthy amount of dough in the bowl for eating- hey I do not care what the world thinks, I LOVE cookie dough). I left two dozen as your usual, every day, chocolate chip cookie. That last dozen, though, I wanted to be different.

I rustled through our pantry looking for something to add to them. Something that wouldn't just seem thrown on top, but something that might enhance the cookies. In the back I found my half full bag of Heath Toffee Bits (leftover from the Banana Caramel Toffee cupcakes- mmmm).

My husband loves those things. He will eat them by the handful straight from the big- which is why the bag is in the very back of the pantry. I like toffee, but I rarely eat it.

The last dozen cookies had a very healthy amount of toffee sprinkled on them before they went into the oven.

After eating one of the toffee cookies, I decided that I personally prefer my chocolate chips the old fashioned way. If it ain't broke- don't fix it.

My husband, however, thought it was a wonderful combination and thoroughly enjoyed eating them.

So there you have it- if you have a desire for something fresh baked from the oven, go for it. You never know what might happen.

Tuesday, June 09, 2009

I Can't Bake Without: OXO Good Grips Cookie Scoop

Well, the move is progressing along nicely- and our kitchen is now completely unpacked. However, I have yet to bake anything in the new kitchen (hopefully that will happen this weekend). Combine that with the fact that all of my craft materials are still packed and chaotic, it's time for another segment of "Things I Can't Craft Without" but this time, it's a Baking Edition.

I see what you're thinking over there "yawn, a cookie scoop." But hold on dear readers, I'm here today to tell you that you can do more with a cookie scoop then just make drop cookies.

This is my cookie scoop, the OXO Good Grips Medium Sized Cookie Scoop. I bought it a few years back when I was making mounds of Holiday Cookies because I was tired of my lame attempts to make my cookies come out at about the same size. I settled on the medium, because the small was not going to cut it (I don't like tiny cookies) and the large was just...too big.

It works wonders on my drop cookies, but that shouldn't be a surprise as that is what it was created to do. I use it occasionally for rolled cookies, when I want a nice uniform look, because I don't trust myself to roll 2 dozen cookies in the same size.

Ok, ok, I hear you out there "so why should I not be yawning at this entry again?"

Here it is....are you ready for it?

The best use ever for this cookie scoop is to make cupcakes. Yeah, you heard me, I said cupcakes.

People always ask me how I get my cupcakes so even- without a few random small or overly large cupcakes. This is my secret- I use my cookie scoop to put batter in the baking cups.

It's so much easier/cleaner then trying to pour the batter from my mixing bowl/measuring cup/ziploc bag.

A regular sized cupcake takes between 1.5 and 2 medium cookie scoops of batter. A Texas Cupcake (jumbo, large, whatever) takes probably closer to 3-4 scoops. My mini's take between 1 and 1.5 scoops. Some day, I will probably end up with both the small and large sized cookie scoops too.

If you aren't using a cookie scoop to make your cupcakes yet, get on it. I promise you will think it was the best idea since the invention of velcro.

Wednesday, May 20, 2009

I Can't Craft Without: Martha Stewart Bone Folder

So, even though I'm not currently crafting, crafts have been on my mind an awful lot lately. I'm lusting after a new sewing machine, stacking up project ideas and new techniques to learn, and dying to get my new kitchen and craft space organized.

I was mentioning to my friend K that I won't be blogging much until I'm settled in the new house. We went on to talk about various projects we were working on and she mentioned her need for a bone folder.

This led to my recommendation of a few types, and my ultimate statement that I loved my Martha Stewart Bone Folder. Upon patiently (and kindly) listening to me profess my love for my MS bone folder, K said "you should totally do a feature on your blog about the tools you love."

So, here we are folks, #1 in a series of things I can't craft without.

Why do I love my MS bone folder, I can hear you asking? Well, let me tell you.

I used to have a cheap plastic "bone folder." It broke. True, I was using it for something other than it's intended purpose, but that sucker never really made my creases as crisp as I would have liked.

I decided that my next bone folder would be heavy duty and get the job done. I went to Micheal's to have a look around. I didn't really like the options they had, so I thought I would check out the Martha Stewart section (I had a 40% off coupon). Lo and behold, there it was- the MS bone folder. Love at first sight.

The MS bone folder comes in a plastic pouch with a snap closure. While unnecessary, I like the pouch because it gives me the feeling that my bone folder is "safe" when not in use. It stays clean, isn't being dinged up by my other tools, and has a home.

But, the best thing about the MS bone folder? It's dual sided. There's a wide end that you can use for smoothing your folds or paper and for burnishing (polishing), and on the other end there's a pointed tip for scoring.

It's also made out of a durable and heavier duty (than my plastic one) melamine. That sucker is sturdy, let me tell you.

If you're creasing your cards or papers with your fingernail or another found object around the house- stop it! Go out and get yourself one of these, stat. I swear to you, you will thank me.

**While bone folders were originally given their name because they were constructed from animal bone, nowadays most are made of melanine or other heavy duty non-animal products.**

Sunday, May 17, 2009

Bead Up!

One of my good friends has been selling her gorgeous jewelry for a while now on Etsy.

I mentioned in passing back on May 5 that she's started up a blog about her jewelry.

Well, today's your lucky day! She is giving away a piece of her jewelry. What do you have to do to enter? Just hop on over to her blog and leave a comment with your favorite piece from her Etsy shop. Hurry though, you can only enter until Monday, May 25.

If you like hand made jewelry, you're going to love Bead Up. In her blog, Christyn shares her inspiration and process. She puts a lot of time, thought, and heart into her jewelry. I promise you won't be disappointed.

Cup O'Cakes is Moving!

No, don't worry, the blog isn't moving, and my website is still at Cup O'Cake Designs.

But, my husband & I are moving. We've bought our first house and are in the complicated process of packing, closing, and moving.

The wedding cupcakes were my last big project before the move- which is why the blog has been (and will continue to be) quiet for a while. Expect to see posts again in early June.

For now? You can check out the pictures from the wedding on my flickr.

Friday, May 08, 2009

The Road to 135 Cupcakes

8:00 am- First thing's first. Making a list of ingredients so I only have to take one trip to the grocery store today.

9:51 am- Back from the grocery store and washing up the last few dishes, I've donned my apron and am ready to start the baking marathon. Also, saying a huge Thank You! to my husband who cleaned up the kitchen on Thursday before I came home. He did a mound of dishes in preparation for my day of baking.

10:54 am- The first two dozen cupcakes are in the oven- Chocolate Peanut Butter. I've got another 11 waiting for their turn (10 regular, and 1 extra large for the Groom). I started here because the Chocolate recipes don't call for butter. I'm also pulling out more eggs (for the next batch) so they can come to room temperature. I'm off to wash dishes so I can start making the next flavor.

11:40 am- Cupcakes have finished baking. Taking a lunch break.

1:30 pm- Starting up again with the Mint Chocolate Chip cupcakes. My break was a little on the long side, but I'm still fine for time.

2:10 pm- First two dozen Mint Chocolate Chip cupcakes are in the oven. There are 11 more waiting (again, 10 regular sized and 1 extra large for the Bride). I'm washing the dishes so I'm ready to start making the next batch. I also need to wash some of my cupcake containers (Cupcake Courier, Wilton 3-in-1, and my regular old Tupperware) so I can store these puppies.

3:45 pm- Margarita cupcakes in the oven- well 1/3 of them. And, with that I am 1/4 of the way done with the cupcakes.

4:09 pm- Live blogging saved my behind. I forgot to set a timer after I rotated the cupcakes. Thankfully, I was able to check the blog to see when I put them in originally and avoided overcooking. Sweet.

6:08 pm- The Margarita cupcakes have been done for a while now. While I was baking the last 10, my husband came home with dinner. So, I took a nice break to eat and catch up on The Office, 30 Rock, and Scrubs. Now, back to baking!

6:40 pm- Cookies & Cream cupcakes are in the oven. Whew- so close I can almost taste it.

7:30 pm- Having finished all four flavors, I'm off to the grocery store. Looking back at my first batch I'm unhappy, so I'm redoing them. Which requires more peanut butter chips.

8:30 pm- Back from the grocery store, about to pop the second try of the Chocolate Peanut Butter cupcakes in the oven. The nice part is that I can whip up the two frostings (Margarita & Cookies & Cream) without having to wait for pans to cool.

10:30 pm- Everything is done for the day.

All in all, I think today went pretty well. Sure, I could have budgeted my time a little better. For my first time making more than 4 dozen cupcakes (and it's a big jump from 4 dozen to 11 1/3 dozen) it went smoother than I'd anticipated.

Tomorrow I'll make the last two frostings, frost the cupcakes and transport them to the wedding. I promise to post photos of the set up early next week.

*The goal for today is to bake all 135 cupcakes, make 2 of the 4 frostings, and complete the cupcake tower/stands.*

Thursday, May 07, 2009

What's Going On?

Well, glad you asked.

This weekend I am baking 135 cupcakes, in a variety of four flavors, for a good friend's wedding. I am currently alternating between nervous and excited as I am sure you can imagine.

Not only am I baking, frosting, and decorating the cupcakes- I am also creating cupcake stands and some hip and cute cupcake toppers (identifying the flavors and for the Bride & Groom's special cupcakes).

I took Friday off from my "regular" job to give myself ample time for this project. So, I will be waking up nice and early on my day off to bake. I might check in here from time to time- if I'm not feeling too hectic- to update you on what I am doing.

In the mean time, why don't you check out some of my new favorite blogs?
My friend Danger Kitten started a baking (and sometimes crafting) blog.
Another good friend, Christyn, is now blogging her adventures in beading.
My new favorite design/diy blog How About Orange (mad props to K for recommending this one).

And if you want to laugh and haven't found this one already: Cake Wrecks.

See you all tomorrow!

Monday, April 27, 2009

S'more Birthday Cupcakes, Please


Fired Up
Originally uploaded by Cup O'Cake Designs
My husband's birthday was this weekend. I'd been bugging him for quite some time about what he thought he might like to have. He suggested possibly the Peanut Butter Chocolate cupcakes I made for the wedding tasting, but I wanted to try something different.

I was going through my copy of Vegan Cupcakes Take Over the World and calling out ideas to him when I came upon their recipe for S'mores cupcakes. Perfect! He's been a vegetarian for almost a year and hasn't eaten any marshmallows in that time (since they contain gelatin which is an animal product).

Taking a closer look at the recipe I discovered that they called for their Vegan Vanilla Buttercream. I love that frosting (in fact, it's my new go-to for Vanilla Buttercream), but my Husband does not. Not to mention the fact that I wanted something that was at least vaguely marshmallow-y. Otherwise? How is this like a s'more at all?

I had originally planned to make Vegan marshmallows, but got completely overwhelmed by a number of other things in life (though I do plan to make them at a later date). So I had to search for something else. Marshmallow fluff!

Believe it or not Marshmallow fluff does not have any animal products in it. I used the same recipe for 7 minute marshmallow fluff frosting that I used a while back for the Orange Creamsicle cupcakes. Now, please take note: this is not vegan frosting, it contains two egg whites. My husband does eat eggs, so it wasn't an issue for us.

The cupcakes turned out great. They weren't exactly what popped in my mind when I thought about them, because I'd expected a chocolate cake. These were a molasses cake, which made them extremely moist.

The frosting was super messy. But, what good s'more isn't?

We had a cast party for the play my husband is currently in on the evening of his birthday. The woman who is playing his wife in the show had her birthday the following day. What better way for the two of them to celebrate with their own special cupcakes.

You can see pictures of the whole group of cupcakes on my flickr.

Tuesday, April 14, 2009

Cupcake Tasting


Cupcake Tasting
Originally uploaded by Cup O'Cake Designs
This weekend I had my very first Cupcake Tasting. A friend of ours is getting married in May and asked me if I would make the cupcakes for her wedding. Of course, I jumped at the chance.

Anyone whose been involved in planning a wedding knows that one of the best parts of the planning is the cake tasting! I couldn't deprive the Bride and Groom of this experience, so after getting an idea of their favorite flavors I brought over seven kinds of cupcakes for them to try (along with some family members).

I made them mostly in half batches and left many of them behind for the Bride & Groom to share with friends and co-workers. The few that were left came with me.

I made: Mint Chocolate Chip (chocolate cupcakes with mini chocolate chips, topped with mint swiss meringue buttercream and mini chocolate chips- top left), Vanilla Vanilla (vanilla cupcakes topped with vanilla buttercream- top right), Vanilla Chocolate Chip (vanilla cupcakes with mini chocolate chips topped with vanilla buttercream and mini chocolate chips- below the Mint and Vanilla cupcakes), Peanut Butter Chocolate (chocolate cupcakes with peanut butter chips, topped with chocolate swiss meringue buttercream and Reece's pieces- fourth from the top on the left), Margarita (margarita cupcakes with margarita frosting- bottom right), Banana Toffee Caramel (banana toffee caramel cupcakes topped with caramel swiss meringue buttercream and drizzled with caramel- bottom left), and Cookies & Cream (not pictured).

It was a lot of work, but I viewed it as a test run for the actual wedding. I am pleased that spending that much time on the cupcakes didn't wear me out or frustrate me- in fact I think it was one of the more relaxing weekends I have had lately.

The Bride & Groom chose their favorite four flavors (Cookies & Cream, Peanut Butter Chocolate, Mint Chocolate Chip, and Margarita) for their big day.

Friday, April 10, 2009

Reece's Cupcakes


Reece's Cupcakes
Originally uploaded by Cup O'Cake Designs
A few weekends ago my husband and I had a small birthday gathering to go to out of state. One of the birthday people (there were multiple persons celebrating) has been seeing photographs of my baked goods from afar for quite some time. I thought it would be a nice birthday surprise (for all birthday persons) to bring along cupcakes.

I decided to try out a Reece's cupcake as I knew that peanut butter and chocolate were a favorite flavor combination of at least one of the birthday celebrants.

I started by freezing mini Reece's cups for four days. My goal was to have the Reece's cups so frozen that they wouldn't melt completely while the cupcakes were baking.

I used Martha's one-bowl chocolate cake recipe as the base for the cupcake. While making this batch, I figured out what went wrong with the Cookie Monster cupcakes. I'd forgotten to add the baking soda. Duh- but let this be a lesson that even people who have baked for quite some time make mistakes. At any rate, this batch of chocolate cupcakes came out perfectly. I topped them off with Chocolate Swiss Meringue Buttercream- not wanting the frosting to overwhelm the hidden Reece's cup.

My only comments are that I did not care for the way the Reece's cups cooked inside the cupcakes. I'm not sure if it is because I used mini Reece's or not, but while they did not burn they kind of crystalized or something (the peanut butter). Everyone else who had one thought they tasted great, but something about it didn't come together for me. I'm going to try again, and fiddle with the recipe a bit and see how they come out.

Visit my flickr to see a picture of the cupcake's innards.

Friday, April 03, 2009

Red Sox Purse


Red Sox Purse
Originally uploaded by Cup O'Cake Designs
I thought today I would post one of the sewing projects I worked on for a client this past holiday season.

I know that lately the blog has become pretty focused on cupcakes (and baking in general), but I am still doing some other craft projects and this was a great one.

I was contacted and asked to help create a special holiday gift for a client's grandmother. As you may have guessed from the photograph, grandma loves the Red Sox*. However, poor grandma's t-shirt was no longer wearable as the player (Coco Crisp) was traded.

I used the t-shirt along with coordinating colored fabric to create a one of a kind hobo bag for grandma. The back of the bag featured the numbers from the t-shirt, cut in such a way that you cannot tell they belong to an ex-Red Sox player.

The bag has an inside pocket (handy for a cell phone or other small items) and a snap closure (as requested by the client).

I think that sewing projects like this are my favorites. I know I have at least five t-shirts laying around that I don't want to toss or give away, but that I don't (or can't) really wear any more. What better way to keep them in your rotation then by up-cycling them into a cute bag.

Have a shirt you'd like up-cycled? Email me!

*Full disclosure: I am a Cleveland Indians fan, so please spare me the Yankees/Red Sox debate.

Friday, March 27, 2009

Birthday Cow


Birthday Cow
Originally uploaded by Cup O'Cake Designs
Waay back in November (I told you I'd try to catch you up on all I did while I took a haitus from blogging), a good friend of mine hired me to make her 24 cards (a mixture of Birthday, Thank You, and blank cards). I was beyond excited, and also a little overwhelmed.

When I make cards, I tend to either make them one at a time, or end up with a series of cards that all look similiar. I was a little nervous about being able to offer my client (I love that word, by the way!) a broad range of cards that she would be able to use. I wanted to make sure that there was a card in there for everyone on her list.

This card was one of the Birthday cards that I created. I have loved this cow stamp (part of an older Stampin' Up set) as long as I have had it, but I definitely have not used it enough in the past 8 years.

Even though the card includes flowers on the patterned paper (though, they could be sunbursts) and a ribbon, I still believe it is neutral enough to serve as a birthday card for men.

You can see some of the other 23 cards at my flickr.

Thursday, March 26, 2009

Vegan Cookies N Cream Cupcakes

For Christmas I got Vegan Cupcakes Take Over the World. I was dying to try a recipe out from the book and when my husband and I were invited to dinner at a friends house, it seemed like the perfect occasion.

The cupcakes themselves are chocolate with cookie pieces baked inside. They are a little denser than I would like, but taste awesome. If you gave these to someone without telling them that they were vegan, they would never know.

I used the vanilla buttercream recipe, and instead of using crushed cookies in the frosting, I placed a cookie half on top as a garnish.

This is my new favorite frosting recipe. It is so darned good, and I think a little less toothache inducing than some other buttercreams.

All in all, they were delicious and I can't wait to try another recipe from the book.

Monday, March 23, 2009

The Cookie Monster

For my first weekend post-play, I wanted to make a more complicated cupcake. I had been thinking about cookie dough and chocolate chip cookies for a while, so it seemed like a good idea at the right time.

Originally, I was going to make the cupcakes look like Cookie Monster (if you read a lot about cupcakes on the internet, you've probably seen these already). However, I ran out of time so I went with something more Cookie Monster inspired.

I started with Martha's one bowl chocolate recipe as the base for the cupcakes. Each cupcake got a bit of semi-frozen cookie dough added in, pre-baking.

Unfortunately, something went wrong somewhere with this recipe. I think that I either overmixed the batter or the cookie dough wasn't frozen thoroughly. The cookie dough ended up baking pretty much into a little cookie and the chocolate cake did not rise nearly enough- so it ended up being dense instead of light and fluffy.

The frosting is a simple vanilla buttercream, tinted blue. I topped the cupcakes off with chocolate chips and chocolate chip cookies pieces.

Regardless of the issue with the cupcake batter, they still tasted quite good. I think I will try this again, with frozen cookie dough and a more watchful eye on the batter mixing.

Friday, March 06, 2009

Faux-stess Cupcakes

(click image to enlarge)

Annnnd....after a brief (hah) 3 month hiatus, we're back! Life kind of got in the way lately (new job, play, the holidays, etc), but I can assure you that I have been baking and crafting over the past three months. I'm going to try to play catch up and post about some things I did in Nov-Feb, but for now how about something current?

My husband and I have been in a play for the past five weeks (closing is this weekend), and last weekend one of our castmates had a party. She decided to have a pot luck, so obviously I chose to bring dessert. Originally I was going to decorate the cupcakes using details from my character, but I ran out of time.

I've been wanting to try my hand at a Faux-stess cupcake (faux Hostess cupcake) for some time now. I love Hostess Cupcakes. I don't think there was ever a time when I didn't like them, but when my husband and I started going on road trips together they were the perfect treat. Two to a pack, so we could split them, and not something we ate on an every day basis.

My husband asked me to make extras (for a coworkers) birthday, so I decided to make the cupcakes in both chocolate and orange flavors (I know the Hostess site says "golden" but I swear those suckers taste orange to me).

I used a Martha Stewart 1 Bowl chocolate cake recipe for the chocolate cupcakes. I was a little iffy on the cupcakes when I put them into the oven- but holy cats were they awesome after baking! This is probably the best chocolate cupcake I have made. They were light, fluffy, and really flavorful.

For the orange cupcakes, I modified a recipe from Wilton for Golden Yellow cupcakes by using 1/2 orange extract and 1/2 vanilla extract (instead of only vanilla). They came out pretty well- light, fluffy, flavorful- but I might cut back a tiny bit on the orange if I make them again.

After baking the cupcakes (each recipe yielded 24 cupcakes), and allowing them to cool, I used the cone method to fill the cupcakes. I definitely need a little more practice with this method but it wasn't hard.

I used a recipe from Baking Bites for the filling, and while it tasted just fine, I'm not sure I would use it again. It called for thickening milk with flour over a medium burner (on the stove) and I hated that method. Just hated it. I would much rather just make a whipped cream frosting for the centers.

The cupcakes were all topped with white whipped cream frosting- because I felt they were already rich enough. Using buttercream would have pushed them over the edge to sickeningly sweet.

Everyone at the party (and my husband's work) loved them. I will definitely be making these again.

I will post a photo of the orange verson as soon as I upload it from my camera.