Monday, July 28, 2008

2 Scoops are better than 1

(click image to enlarge)

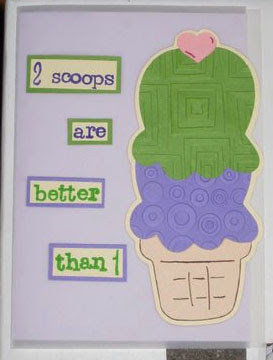
I made this card for a Jack & Jill party that my husband and I attended a few weeks ago. As a gift, we got an ice cream maker and recipe book so I wanted a card that went with the theme.

I cut out the ice cream cone with my Cricut. I cut it out twice, and used only the scoop from the second cut. I ran the ice cream scoops through my Cuttlebug to texturize them, so that they would stand out from one another.

I stamped the sentiment, and used my gel pens to accent the ice cream cone, as well as the stamps.

I used vellum as the outside of the card, and placed the ice cream cone on the right edge, cutting away the vellum so that the ice cream cone served as the very edge of the card.

Mint Chocolate Chip Cupcakes

(click to enlarge)

I made these Mint Chocolate Chip cupcakes for the beer bottling party. Even though I adore pink lemonade, I know that other people prefer their sweets to be of the chocolate variety.

I think the recipe for this might have come from Curious Cupcakes but I can't remember which member posted it. I was drawn to the recipe because I love Mint Chocolate Chip ice cream, and since the recipe calls for Chocolate Milk, I was intrigued.

I made these the day before the party, and I can't tell if that is why the cake was a little dry. The mint came out nicely, but I think next time I might use a different chocolate cake recipe.

The frosting is a mint merengue and once again I could not get the merengue to fluff up as much as it should have. I honestly think it is because I couldn't get the burner up to a high enough temperature. I might stop using merengue until I have a different stove. I tinted the merengue green with food coloring, because I always think mint when I see green food. I topped the merengue with sugar sprinkles and mini chocolate chips.

Pink Lemonade Cupcakes

(click image to enlarge)

My husband had a beer bottling party a few weeks back (he brews and bottles his own beer). Everyone brought a different kind of beer to share. I figured it would be a good idea to have something more substantial than chips and dip for food. So, cupcakes it was!

I chose the Pink Lemonade cupcake because Pink Lemonade is one of my all time favorite drinks, especially in the summer. It's crisp and fresh, with just the right amount of sour taste.

I got the recipe online at the Foodie Bride blog. I ultimately cut the lemonade concentrate down (per the recipe) as I would rather have them less tart than overly tart. I think that was a wise choice and they came out perfectly. They were moist and had a great fresh taste- perfect for summer. I added a little bit of red food coloring to the dough to ensure that the cake would come out pink.

The Lemon buttercream was better than I could have imagned. I was worried that the lemon flavor would be strange in a buttercream, but I shouldn't have. It was great, and the perfect compliment to the cake. I added yellow food coloring because I thought the yellow frosting went well with the pink cake. I topped them off with pink sugar sprinkles.

If you like lemonade- these are the perfect cupcakes for you. I imagine they can also be made with limeade concentrate, which sounds delish.

Tuesday, July 08, 2008

Happy Birthday (7)

(click image to enlarge)

I made this card for my cousin who just turned 7. I wanted to highlight her age and use a theme that fit with the wrapping paper her gift was wrapped in.

All of the shapes were cut out with the Cricut. I used the wrapping paper to cut out the 7, and coordinating colors for the other dots on the card. I traced the cat's accents with gel pens and used google eyes to make the card a little more playful.

Thank you Thank you Thank you

(click image to enlarge)

I love this card because even though it was simple to create, the design really catches the eye.

I used a paper cutter to cut strips from a patterned piece of cardstock and three colored pieces. I glued the paper to the card, and alternated the colors with the patterns. Once the paper was secured on the card, I used a clear stamp to stamp "thank you." I repeated the stamp until each color had a solid line of "thank you's" across it.

Congrats- Mortgage Burning

(click image to enlarge)
For the Mortgage party, I also made a sign. My Mom had made a set of fliers with photos and stories of the past 30 years at our house. This sign was the perfect addition to her display.

I used the Cricut to cut out the letters and the background. I also cut out a "mortgage" covered in flames, and a home that was stamped as "paid." I used glitter glue to accent certain portions of the sign.


Celebrate Centerpiece

(click image to enlarge)

I wanted to surprise my Mom for her Mortgage Burning Party, so I put together this paper centerpiece for her.

I used my Cricut to cut the flowers and shapes- including the word "celebrate" which I attached to the front of the pail.

Inside the pail is a piece of flower foam (the green kind that holds water and stems of flowers) to keep the pieces in place. I used cheap bamboo skewers (about $2 for a pack of 100) as "stems."

Banana Cupcakes with Honey Cinnamon Frosting

(click image to enlarge)

My parents had a Mortgage Burning Party this weekend- after 30 years they've finally paid for the house- and I offered to make dessert. I was looking for something that my Dad would like, since he's not into your typical sweets. He loves banana cake, so I looked for a cupcake recipe.

I used the Martha Stewart recipe, as well as her recipe for honey cinnamon frosting. I'd used the recipe once before, but was really unhappy with how the frosting turned out. This time around, I baked the cupcakes a day before frosting them. I think that made a big difference- last time they must have been too hot, which melted the frosting.
My Mom has a Wilton Dessert Decorator which she hadn't tried out yet, so I offered to test it out. It worked great to get the frosting onto the cupcakes. The cupcakes were delish and everyone loved them.

Tuesday, July 01, 2008

Ring Pillow

(click image to enlarge)

A very dear friend of mine got married in April. Having gotten married fairly recently myself (2 years ago last month), I offered to do whatever I could to help with the wedding. She asked me to make some tags for favors and to sew her ring pillow. She has a great eye for design and had something very specific in mind. I'd never made a pillow cover before (I have sewn home made pillows, stuffed with fiberfill), but I was definitely up for the challenge.

I had her pick out the fabric- to ensure that it would match the wedding colors, and be something she would want to keep at home, after the wedding (as an accent pillow). She also designed the pattern for the pillow itself.

I had never sewn curves into fabric before. I practiced on some fabric scraps that I had, to get the hang of it. I watched numerous YouTube videos demonstrating the technique. I had more than enough fabric to try again, if I messed up. Of course, being a perfectionist and this being for a friend's wedding, I didn't want to mess up.

Luckily, it turned out pretty well. The blue curve wasn't as even or centered as I would have preferred, but I think I am probably the only person who would have noticed that. You can see from the picture below that sewing the back to the front off set the image a little. The colors in the below picture are also more true to life.