Thursday, December 09, 2010

Homemade Funfetti

I'll spare you my usual diatribe about Funfetti. Suffice to say, while I can understand its appeal I don't feel it is a unique flavor.

A few weeks ago, I wanted to whip up some cupcakes for my husband's friends who were getting together to brew some beer. It probably didn't hurt that I was going to be hanging out with the wives, and wanted something to snack on.

Vanilla cupcakes are something that should be in your back pocket- a recipe you can customize by adding other flavors or ingredients (ie chocolate chips). I don't like making vanilla cupcakes. I feel like they never come out the way I want- they're always too dense for me.

At any rate, I used my current favorite vanilla cupcake recipe (Billy's Vanilla) and to jazz it up I mixed in rainbow sprinkles (jimmies- whatever you want to call them). I think I probably used about 1/2 cup of sprinkles (the recipe makes around 2 doz. cupcakes).

I topped the cupcakes with my favorite Vanilla frosting recipe (from Vegan Cupcakes Take Over the World). If you haven't used this recipe yet, I could not recommend it more highly. I always make more than I need, so I can eat some directly from the mixing bowl later. In fact, I have some in my fridge right now (from a batch made last night), mmm. Where was I? Right, ok so then I topped the frosting with some rainbow nonpareils because I'd almost exhausted my sprinkle supply on the batter.

Viola! Homemade funfetti.

One housekeeping note: I know I've been very lax in my posting. To be honest, I haven't been doing that much baking or crafting recently. Work is typically very busy for me over the summer, then I went on a nice long vacation, and when I came home I learned I was pregnant. While I can't wait to meet this new little person, I haven't had the energy or the time to devote to baking and crafting that I did previously.

I am working on a number of crafted items for the Holidays, which I will photograph and blog after the recipients have opened their gifts. And, I hope to tackle some new cookies this weekend or next.

In short: even though I'm not posting as much, I'm still here and eating desserts!

Tuesday, October 19, 2010

Not Your Momma's Rice Krispie Treats

Rice Krispie treats are almost never found in our house. It certainly isn't because we don't like them, we do. It's because my husband is a vegetarian and chooses not to eat marshmallows.

I've been watching Top Chef: Just Desserts (only for the cooking, the contestants make me want to throw something at the tv) and my husband happened to catch a piece of one of the episodes. In that episode, one of the contestants made a more grown up version of Rice Krispie Treats that featured peanut butter and Nutella.

Ever since that episode, my husband has been asking me to make some Nutella Rice Krispie treats.

I can hear you wondering, what did I use in place of marshmallows? I've tried using vegan marshmallows before, but I didn't like how that came out (they don't melt the same way regular marshmallows do and I don't think I had enough of them). So, this time around I used marshmallow fluff. Yeah, fluff that weird sticky substance that I used to love on peanut butter sandwiches as a kid.

So, with the Rice Krispie treats made and cooled, I added a layer of Nutella (using a full 13oz jar) and then a layer of melted chocolate (10oz) on top of that.

The result? It's impossible to eat just one square at a time.

Tuesday, September 21, 2010

Girls with Glasses

I cruise around a lot of other blogs on the good ole interwebs. Mainly I like to look at cooking or sewing or crafty blogs. I find inspiration there and motivation sometimes. Plus, it's just really fun to see what other people are making.

This morning, I was catching up on This Mama Makes Stuff and a post from September 19 caught my eye. Carrie sometimes posts about her family and what they are doing and this week she's shared with all her readers (and her readership is much more vast than mine) that her daughter needs glasses. Her daughter is going into Kindergarten and she's feeling nervous about having to wear these new glasses to school.

I got my glasses in the third grade, and when I tell people that it's as if they couldn't imagine having to endure that torture so young. I don't remember it being particularly awful for me. I do, however, remember popping out the cheap sunglass frames from a pair of awful blue plastic frames I had, so that I could "practice" wearing glasses. I wanted to make sure I knew what to do with them. I'd have to ask my mom, but I remember wearing th
ose suckers for like a week in preparation for the real thing.

So, Carrie's post hit home with me. She asked her readers to share photos of themselves as "Girls with Glasses" to help her daughter see that there are tons of amazing women out there (and girls!) who rock the frames.

Without further ado, I offer up two photos of myself:


This one is a silly one. My sister is currently in Optometry school studying to become, what else, an Optometrist. When I visited her last November, she let me play around with her traveling kit that helps diagnose prescriptions.


This is my more serious photo. I love my glasses so much. I didn't mind them in third grade, but around middle school I started to hate them. My parents let me get contacts in High School and I wore those throughout High School and College. After I graduated from College I just couldn't stand wearing my contacts every day while looking at computer screens at work. I begrudgingly went back to glasses.

Now? I love my glasses. I own two pairs of contacts for "beach days" but I much prefer to wear my glasses. I finally found a pair of frames that I love, and I'm proud to be a Girl with Glasses.


Princess, I hope you rock out those frames at Kindergarten! Glasses are awesome. I promise.

If any of my readers out there are fellow bloggers or tweet and are also Girls with Glasses- please visit This Mama Makes Stuff and share a photo of yourself.

*I haven't posted in a long time, and for that I am sorry. I've done a few things here and
there, but life has been hectic. I promise to start posting more, and to explain my extended absence in another week or so (sorry, out of town this weekend for a wedding and another wedding the following weekend!).

Saturday, May 08, 2010

My Dog is Awesome


Straying a bit from my typical Craft/Baking norm to post this video. Enjoy!

Tuesday, May 04, 2010

Icebox Cake

A few weeks ago my husband and I were watching TV on Sunday morning, aimlessly. I settled on Food Network's "The Best Thing I Ever Ate" and the theme for that episode was something like frozen/cold treats.

I don't remember much more from the episode, except that someone mentioned an icebox lemon pie. At that moment both of us started drooling just thinking about it.

My husband said "make that" so I hopped online to try and find a recipe. I didn't like what I was pulling up, but I remembered seeing a post a while back on Smitten Kitchen for an Icebox Cake.

This was super easy, but definitely worth it. It's twelve layers (the recipe over at SK calls for 11, but I wanted to use up all the cookies) of chocolate wafer cookies and sweet whipped cream goodness. One thing to keep in mind- the cake has to refridgerate overnight. That's what allows the whipped cream to soak into the cookies.

It tastes like a gigantic Oreo cookie. It's so stinking good, we probably could have eaten the whole thing in two sittings. However, we paced ourselves- because this is not a diet friendly recipe.

Anyways, if you're looking for a cool treat this summer- make an Icebox Cake. I promise you won't regret it.

Wednesday, April 28, 2010

Rocketship Pillow

*Housekeeping note: I have a slight backlog on projects I want to post. I'm going to try to catch up, but my camera is not working so I may be MIA until I can take care of that issue- or I might post and add photos at a later date*

Last month when our family visited we celebrated my nephew's fourth birthday. You remember the giant cupcake cake, right? Right.

Since our nephew was visiting on his birthday and he was on a roadtrip with untold number of hours spent in the car, I wanted to make him something fun that would come in handy on the trip.

I looked through my One Yard Wonder book and found a super cute Rocketship Pillow that I thought would be perfect. Comfy and useful for napping in the car, cute and fun for at home, and it even has a little pocket where he can stash his stuff.

If I could go back in time and remake this, I think I would put piping on the "fins" of the rocketship (there are three, the third is in back). I used piping on the pocket instead of bias tape, because I liked the look more. I modified the pattern by sewing on "windows" that had "aliens" peeking out of them.

This is not a pattern for a beginner. But if you can piece your way through it, you do end up with a very cute and useable pillow.

Monday, April 26, 2010

Reece's Cup Cake

No, not cupcakes- a Reece's Cup cake.

Sunday was my husband's birthday and I asked him what kind of cake he wanted. He said "surprise me." That is...kind of dangerous because it allows me to do whatever I want, meaning not necessarily what he would want.

However, it being his birthday I went with one of his favorite things: peanut butter. And who doesn't immediately think of chocolate when peanut butter desserts are on the table?

I started with a yellow cake recipe from my Sur La Table baking book (another recipe towards my resolution!). I read their whole primer on cakes, even though I've been baking cakes (and cupcakes) for quite some time now. I didn't learn a whole lot of new information, except that pre-beating your eggs (just enough to mix the whites and yolks) can help keep your cake light and fluffy. The other stuff was mostly information about bringing cold ingredients up to room temperature before adding and the importance of sifting.

The yellow cake recipe yeilded much less cake than I had anticipated, so I used one 9 inch round pan, instead of two. Since I only had one 9 inch round of cake, I decided to section it into three pieces, instead of two.

I found a quick and easy peanut butter frosting recipe in my Martha Stewart Cupcakes book. I was a little surprised to see that it called for cream cheese, but it was delicious. The peanut butter frosting was put between the layers of cake and I should have been a little more generous with the frosting.

To top the cake I used a chocolate ganache recipe (from Sur La Table, again). I was beyond pleased that my crumb coating worked like a charm. (Crumb coating, in case you don't know, means that you coat the cake with a thin layer of frosting/ganache and then let it set. Once the layer is set, you add a more generous layer of frosting/ganache so that the crumbs do not show.)

As a final touch, I added some mini Reece's cups and peanut butter frosting accents. This cake should be kept chilled until about fifteen or twenty minutes before serving.

Mmm, don't you want a piece?

Thursday, April 08, 2010

Giant Cupcake Cake

I know I've been MIA for a bit- things were a little hectic. We had a visit from some family and then our basement flooded. No worries, everything/everyone is just fine and dry now.

Our family's visit coincided with our nephew's 4th birthday. Although we celebrated his birthday in NYC a few days before his stop by our place, I was itching to try out my Cupcake Cake pan and this occasion was too good to pass up.

My nephew requested chocolate cake, so I used my favorite recipe and layered vanilla buttercream in between the "frosting" and the "cake" sections.

My crumb coating is terrible on cakes. Terrible. I wanted this cake to look like a cupcake I would bake and not like one I'd dropped on the floor. I decided to try using rolled buttercream (because I'm pretty sure my nephew would not have enjoyed eating fondant on his birthday).

My experience with rolled buttercream was interesting. I am a perfectionist (I may have mentioned that before) and I got quite frustrated. The rolled buttercream was probably a little too warm (too much kneading by hand) and a little too sticky (I kept adding powdered sugar by the handful, but it never seemed to un-stick).

However, having said that- I think it looked great on the finished product. Plus, it tasted really good too. It's quite sweet, but I think that's right in line with it being a buttercream product.

I used the leftover cake batter to make coordinating cupcakes.

Tuesday, March 30, 2010

Kitchen Appliance Survey

Y'all know I love my Kitchenaid mixer with a love that knows no bounds. But we have a conundrum in our house.

Recently we've been doing a lot of our cooking from scratch- fresh homemade breads, pastas, and sauces. We've been using our Kitchenaid daily and our little food processor has come in very handy. (I think this is the food processor we have currently.)

So, the question is this: Is it better to get some attachments for our mixer (pasta, slicer, shredder) or to upgrade and get a larger food processor?

Mainly I think we would use either for shredding/chopping. We have a mandolin, which we use regularly, but we're looking for something to make the whole process quicker/easier.

I'm drawn towards the attachments because of my love for the Kitchenaid, but also because you can use those attachments for cheese. (Mmmm, cheese.) But in the long run, I'm not sure if that's the smartest way to go.

Do you have any Kitchenaid attachments? A big food processor? Do you prefer one over the other? Have any other tips or advice?

Lay it on me.


Monday, March 22, 2010

Soft Pretzels

Who doesn't love soft pretzels? They are always so tempting, but how do you know if they're fresh?

Easy, make them yourself.

I'd had this recipe on my "to-try" list since about December of 2008. It just kept getting shuffled to the bottom of the list because I tend to gravitate towards sweets (obviously).

Last month, my husband came home from a friend's birthday party raving over the soft pretzels. Wouldn't you know it, they were from the very same recipe I'd been wanting to try.

This month, we've been trying to make everything we eat at home from scratch. Homemade breads, sauces, pastas, etc. It seemed like the perfect time to finally retrieve this recipe from the bottom of the list, dust it off, and eat pretzels.

It certainly didn't disappoint. After a minor mishap with the yeast (I might've used 4 tbsp instead of tsp- whoops! Not to worry though, we used that activated yeast to make bread) everything went pretty much according to plan.

I was thrilled to roll out the pretzel dough and was pleasantly surprised to find that my "pretzel crossing" skills weren't gone, just dormant. (I worked at a bagel shop for about a year while in High School. Learning to make the pretzel bagels have that perfect cross seemed a useless skill at the time.)

The recipe yielded 8 big ole soft pretzels. If I make it again (ok, when I make it again) I think I'll go for smaller pretzels. The recipe also includes some delicious queso dipping sauce. Because if there's one thing that makes soft pretzels more yummy, it's hot spicy cheese. Mmmm.


Note: I used regular old light brown sugar from the grocery store, instead of Muscovado, and my pretzels came out just fine.

Friday, March 19, 2010

My Resolution: Chocolate Croissants

Over a year ago my husband got me a very generous gift certificate to Sur La Table for my birthday. I quickly signed up for one of their new baking classes (Tarts!).

I was a little disappointed in the class. It moved a bit too slowly for me, and I wanted to experience making more than just two kinds of tarts. I chose to use the remainder of my gift certificate (along with the coupon I received for taking the course) to purchase some items at the store. One of the things I purchased was their new book, The Art & Soul of Baking. All of the tarts we made were from the book, as well as all the recipes used in their other baking courses. I reasoned that since the class felt too slow to me, if I owned the book, I could teach myself.

The book is wonderful. It has primers before each chapter with tips and things to avoid to be successful with each type of baked item (each chapter is a type of baked good ie pastries, cookies, breads, etc). There are all sorts of great techniques and photographs.

There are probably at least 50 things I wanted to make just from reading the recipe's title- and there are over 250 recipes in the book. But the book just sat on my shelf, collecting dust.

No more!

After conquering my fear of cheesecakes, I resolved to try one new recipe from the book every month. This past weekend, I decided to tackle one of the recipes: Croissants.

After two days of making my dough block, laminating my butter, and I don't even know how many envelope and book folds I still don't know why I started with such a complicated recipe. Probably because I love Chocolate Croissants.

People, this is not an easy baked good. I started on Saturday morning, by making both my dough and my butter (and I'm not using the proper terms because the book is at home, and I don't remember them) blocks. That was probably the easiest part. Both have to sit in the fridge for a bit, to cool down and the dough needs to proof (expand/rise).

After that, I spent the majority of my Saturday rolling and folding and rolling and folding the dough. I should have used a ruler to ensure I was rolling and folding to the appropriate dimensions, but I'm not that kind of baker. Putting the laminated butter (which means- I mixed up my butter with a little flour, that helps create the flaky layers in the finished pastry) into the dough was fairly easy- roll out butter into a flat rectangle, lay on top of dough, fold dough over.

Every turn (fold) of the dough got tougher. After the last turn, I told my husband there was no way we were eating croissants until Sunday. I was too exhausted.

Sunday morning, I got up, and got my dough out of the fridge. I rolled and I rolled and I rolled, but I never got the dough down to that magical 1/4 inch that the book called for. I gave up and just cut the croissants thicker than what the recipe said. I wrapped them up, complete with my grated chocolate inside, and popped them into the oven.

People- if you EVER get a hankering to make croissants? One tip- do NOT use sideless baking pans. That was a big ole mistake on my part. Technically, from what I understand, the butter is not supposed to melt out of your croissants onto your baking sheet. However, I obviously did something (or more than one thing) wrong, because it totally did. And my sideless baking sheet resulted in a ton of melted butter dripping all over the oven, the pan, the floor, myself, my dog, and who knows what else. The second pan was fine because it had sides- but the damage was already done. All that melty butter from the first pan? Caused my kitchen to smell like burnt butter and smoke like we had a fog machine running.

The croissants turned out ok- the bottoms were clearly soggier than intended. I can safely say that I was probably baking beyond my abilities and I won't be craving croissants for quite some time.

If I do get a craving for them? Well, I'm sure there's a good bakery nearby.

Here's my helper dog, Wallace, who always seems to forget that flour doesn't taste nearly as yummy as it looks:

Monday, March 15, 2010

Chocolate Chip Cookie Cupcakes

Oh my god you guys.

Look, I know it must seem to you (all four of you who read this blog) that I am forever gushing over some new amazing recipe for cupcakes (or other sweet treats). I think that's only because by the time I post the dessert here, it's already been taste tested by reliable sources (aka not just my husband who has to like whatever I make- though he doesn't always like everything). It's rare that I will post about something that didn't last long enough for anyone outside of my household to try.

This though? This. Is unbelievable.

I am a huge chocolate chip cookie junkie. In years past I often lamented my ability to make a prefect looking chocolate chip cookie. More recently, I embrace that my cookies come out either too puffy or too flat. Because the important thing is the taste. And I love the taste of a good chocolate chip cookie. If I had my druthers (and weight gain were not an issue), I would probably bake a batch of them a week.

But, I digress. The point of this post is the Chocolate Chip Cookie Cupcake. Not my obsession with chocolate chip cookies. Ahem.

A few fridays ago, my husband really wanted cake. I did not want to bake another cake (so soon after the mini cakes and the cake truffles). He rarely requests specifics of my baking, so I set about finding a simple cupcake recipe- one which called for ingredients already in my pantry. I spotted this (in my Martha Stewart Cupcakes book), and called it out to my husband. Once he gave me the green light, away I went.

The recipe is pretty straight forward and quick. It doesn't actually call for frosting, but I love frosting more than is healthy. So, I whipped up a quick almond swiss meringue buttercream (and if you've never used half vanilla half almond extract in a frosting, you haven't lived!) to top them. Perfect combination.

The recipe made about 22. Only 4 of those ever left our house.

I used some super cute cupcake papers that I've had on hand since my birthday back in Sept. I got these at Bake It Pretty (thanks K for the gift certificate!). Look, even the bottom of the paper is cute.


By request, the recipe on Martha's site. I used chocolate chips instead of chunks- it's what I had on hand.

Thursday, March 11, 2010

Getting Over My Fear of Cheesecakes: Bakeover II

I hear you out there. You're surprised that I'm scared of making a cheesecake. That's ok, you can be surprised. Or you can laugh at me. I'm cool with that. But, I am.

Or I was.

Maybe it was the waterbath, or the fact that cheesecake can crack and I hate imperfections. I don't know what it was. I love eating cheesecake, so it wasn't the taste that's kept me from baking one for so long.

When I told Danger Kitten about my fear of cheesecakes and admitted my desire to bake the Raspberry Cheesecake cupcakes (from Martha's Cupcake book), she told me she'd help me out. See, she also wanted to bake those cupcakes. Unlike myself, however, she had baked a cheesecake before.

Two weeks ago Danger Kitten, her husband, our friend L, and her husband all came over. The boys (my husband included) were bottling up three kinds of beer (that they brewed a while back- you can read more about that at Brewfus Alewise's blog, he's Danger Kitten's husband) so we ladies decided to have another Bakeover.

Danger Kitten and L walked me through the crust process. Once the crusts were ready, we doled out the cheesecake and raspberry concoction. It was a nice little assembly line. Look at those beauties up there. Mmmm.

Too bad, as a cheesecake novice, I didn't realize they had to chill in the fridge for FOUR HOURS after baking to set. Whoops. The boys? They were a little disappointed. Thankfully, I had Cake Truffles to soothe their needs for sweets and Danger Kitten had brought Vanilla cupcakes.

These little raspberry cheesecake cupcakes came out just delightful. Totally worth the process. And they helped ease me into cheesecakes. They were somehow less scary because of their size.

I didn't manage to snap any good pictures of them after they were baked and set, sorry about that. But I think you can see from the "pre-baking" photos how delicious they were.

And because this was still during the Olympics, I decorated one in theme.

Friday, March 05, 2010

Cake Truffles

Mmmm, cake.

But what do you do with all those left over cake bits after you level your cake and put it all together?

Cake truffles, my friends. Cake truffles.

If you haven't already visited Bakerella's website, go there now. I'll wait. Bakerella does amazing things with her leftover cake crumbs and pieces.

A few weeks ago I went to a dinner party with some friends. I offered to bring dessert because, well, it's what I do. I made minature chocolate cakes (with yummy orange swiss meringue frosting in the middle). I ended up with a LOT of cake bits left over. And I didn't want to waste them.

Viola, cake truffles. I've made these before (as Cupcake pops) and they are always a huge hit. You take your cake bits, mix them with frosting, and dunk in chocolate. That's it. It's easy, but time consuming- be forewarned. And it makes a lot.

The ones you see above are chocolate cake (my favorite Martha one-bowl recipe) with vanilla buttercream (also homemade) in both white chocolate and chocolate coatings. We like to keep them in the freezer in our house.

I bet once you eat one, you'll need to eat at least two more.

Monday, February 08, 2010

The Best Accidental Cookies, Ever

This cookie has been transported across state lines to prove its deliciousness. It is requested by out of state visitors. It doesn't last more than three days before it disappears. And to think this cookie almost never existed.

Last year, right around the holidays I tried out a gingerbread cupcake recipe. I didn't blog about it because the holidays were crazy for me and I wasn't super enthusiastic about the end result.

After making the cupcakes, I ended up with a whole lot of left over ginger cream cheese frosting. I hate to throw out left overs. In fact, right at this very moment I am pretty sure I have two piping bags full of frosting in my fridge, because I am pretending I will use them.

What's a girl to do with that much extra ginger cream cheese frosting? The holidays were looming overhead and I thought "gingerbread cookies!" I made the cookies and slapped the frosting in the middle, as a Holiday cookie sandwich. Then, I fed them to my visiting friends. That's how I knew I'd hit the jackpot.

Truth be told, no matter how much I love a recipe it just doesn't seem like a real hit until someone else craves the dessert as much as I do.

This past weekend some of my closest girlfriends came into town. I knew I was going to be baking cupcakes, but I had been craving these cookies since the holidays. They were on the "to-bake" list for the holidays, but time ran short and I got tired.

And this time, I managed to take a picture before the cookies were all eaten up. So, there you go.

Best Accidental Cookie. Ever.

Wednesday, February 03, 2010

Finally!

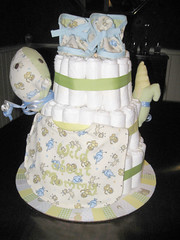
Back on January 3, I promised to reveal a secret project in a week. Here we are, a month later, and I am finally revealing the project.

Due to my camera issues, I wasn't able to get photos of the first diaper cake I put together (on January 3) which is what caused the delay on this post.

I have made a diaper cake before, but this time when I was looking for toys I had a hard time finding things that fit with the theme I was using. For the first cake (in January), I was going with a Rock & Roll theme- the parents met while in a band together and are expecting a boy. I found some interesting toys on Etsy, but I didn't have enough time to order them and await their arrival.

For Christmas, my husband got me the book One Yard Wonders. It's got 101 patterns for projects (ranging from home decor to accessories to clothing) that use only one yard of fabric. I flipped through the book and saw patterns for baby booties and bibs. I was sold immediately. If you can't find what you want at the store, why not make it?

Using the patterns as a springboard, I then decided to make two rattles from scratch to go with the cake. For the original cake I made two electric guitar shaped rattles.

The cake pictured above was for a baby shower last night. She and her husband do not know the sex of the baby (what a fun surprise!) and have painted the nursery in sage green and cream. She is my husband's coworker so I was able to find out the nursery colors as well as the fact that she had many elephant toys and stuffed animals as a child.

The booties and bib were made using One Yard Wonders. I cross stitched "Wild about Mommy" onto the bib, and handmade the elephant and corn cob shaped rattle toys. The elephant actually is not a rattle, but has a squeaker inside. (The corn cob is an inside joke between my husband and his coworker).

You can see more photos of this diaper cake on my flickr account.


Many thanks to M. Mulligan for the photo of the January diaper cake.

Monday, February 01, 2010

Curse Your Sudden but Inevitable Betrayal


firefly
Originally uploaded by Cup O'Cake Designs
Finally, one of the long promised Holiday gifts!

Before I get into the details of the gift, let me start by saying that I lost my battery charger for my camera. I have two camera batteries, but losing the charger means that when they ran out, I couldn't take pictures. I borrowed a friend's charger and now have two full batteries, but I'm not sure how long that will last. I promise to show you the secret things I was working on a few weeks ago later this week.

Back to the subject at hand.

A good friend of mine got me into the show Firefly. If you've never seen it and you enjoy sci fi and comedy, you should check it out. Space cowboys. That's all I'll say.

She loves the show, and I thought this was a perfect way to give her a handmade piece to display in her home. The quote is directly from Firefly. Wash (one of the characters) is playing with toy dinosaurs.

The Stegosaurus is speaking to the T-Rex.

I used black Aida cloth to make the grey and turquoise floss pop.

I put the pattern together and am pretty pleased with the way it turned out.

Sunday, January 03, 2010

Hmm...

It's a blustry winter day today in Connecticut. I can't think of any better way to spend today than snuggled in in my sweats and down slippers- creating homemade gifts.

What do you get when you take 1.5 yards of fabric, diapers, rice, ribbon, and paper?

Tune in next week to find out!