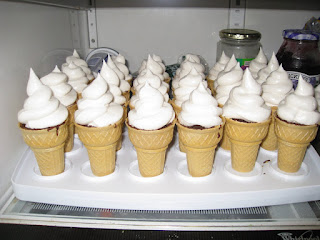
Oh man, when I saw the recipe for Hi Hat cupcakes on the Barmy Baker's blog, I knew I had to try it. I immediately wanted to make the cupcakes in ice cream cones because they reminded me of DQ soft serve cones.
Since this was going to be quite the project, I gave myself two days to accomplish it. I started with the Blackout Chocolate Cake recipe (though I used a different one than posted on that site, as I do not care for coffee).

Here are all my ingredients for the cupcakes lined up. The batter was really easy to put together- but bear in mind that I've been baking for a while and love to bake from scratch. I had 24 ice cream cones, and ended up making a double batch of the cupcake batter. That filled all 24 cones, as well as 6 cupcake wrappers. The batter was very thin.

I ended up baking the cupcakes for about 25 minutes. For the most part they came out fairly flat- though a few of the ones in the cones sort of imploded after cooling. I neglected to take any photos of the cupcakes after being baked.

I put the cupcakes in the fridge overnight, and made the meringue the next day. I got all of my ingredients ready to go and started boiling the water, sugar, cream of tartar, and corn syrup. Unfortunately, I don't think the burners on our stove go hot enough to really cook it into a nice candy mix. There was absolutely nothing I could do about that, so I just got it as hot as I could, and added it to the whipped egg whites.

Everything puffed up according to plan, but it definitely did not stiffen up the way a meringue should. There was really not much I could do here, so I thought maybe if I put the cupcakes in the fridge after piping on the meringue, it would help stiffen the mixture.

Here are my little cupcakes all covered in meringue and ready to go in the fridge. Piping the meringue on was really easy. I don't have any piping bags (because even though I say every other month that I want to take a Wilton cake class, I still haven't managed to do so- this summer, I swear), so I just used a freezer sized ziploc with the corner snipped off.
These went in the fridge for forty five minutes before I started making the chocolate coating. The coating was just melted chocolate with some veggie oil in it. I usually don't put any oil in my chocolate, but the recipe called for it. I'm not sure I'd do that again.
I heated the chocolate in the double boiler and turned the heat down before I started dipping. I started with the regular cupcakes, just to see how it went. The chocolate was so warm that it was melting the meringue. Well, to be honest, I think it was a combination of the heat of the chocolate and the non-stiffening of the meringue.
As the chocolate cooled, my meringue stayed in place. I did reheat the chocolate to get it melty again and that caused one of the meringue toppings to slide right off into the chocolate. I just scooped it up with the spoonula and put it back on top of the cupcake.
After dipping them in chocolate, I put the cupcakes on wire cooling racks (with waxed paper underneath) to drip and added the sprinkles. Once that was done, I loaded the cupcakes back into the fridge so the chocolate could harden.

Let me tell you, these are delightful to look at. Not as delightful? Trying to transport them. I have a cake/cupcake carrier and they were too tall. I ended up laying them on their sides for the trip to the party. It about killed me to do that, but that was the only option. As soon as we got to the party, I went and set them all up right and we left them on the porch until we were ready to eat them (it was chilly enough outside that I wasn't worried they would melt).
Even though the meringue didn't turn out as I would have liked, they tasted delicious and everyone enjoyed them. They were quite messy to eat- if the meringue had set up as anticipated I think it would have been much easier to handle.
If you try the recipe, just give yourself a LOT of time to make them. They are time consuming and a leave a mess in your kitchen. The compliments you get are worth all the effort.


1 comment:
impressive!
Post a Comment