Showing posts with label Cricut. Show all posts

Thursday, December 01, 2011

Embroidered Onesies

More baby shower goodies!

When I thought about practical, yet fun, gifts for the family and expected baby- clothes came to mind, of course. But, I wanted to be sure to make something that would be unique.

I took fabrics and colors from other projects and worked from there.

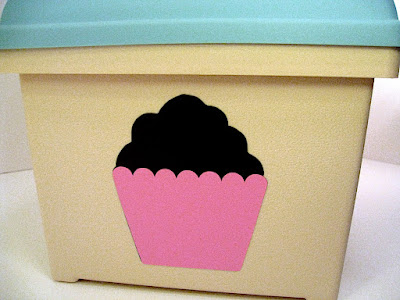
The onesie in the back left is an "S" in the owl fabric for the baby's first initial. Back right is a cupcake- in colors pulled from the owl fabric. And the front one, is my favorite.

I screen printed the skull and crossbones onto the fabric patch first. I used my Cricut to cut the shape out (from the Mini Monsters cartridge) of vinyl. Then I put the vinyl on the fabric and painted the fabric paint over that. I wasn't sure it would work- I was a little worried about the paint bleeding under the vinyl, but I shouldn't have. It worked like a charm!

Plus- I used the shape that it cut out as a tattoo for my sewing machine.


I'll definitely be trying the Cricut vinyl for screen printing single items again.

Wednesday, September 16, 2009

She's Expecting


She's Expecting
Originally uploaded by Cup O'Cake Designs
My parents came up for a visit two weeks ago. My Mom called me a few days before the visit to request a card. Her boss is expecting.

Although I know my Mom's boss, I did not know her favorite color was pink. So, I opted for a gender neutral green coupled with a lovely dark gray.

I cut out the lady and her purse with my Cricut. I used a corner punch to round the corners and stamped the phrase. Once I arranged the lady and phrase on the card, it still seemed to be missing something.

Some crystal accents were the perfect finishing touches.

Congratulations N & P! I wish you the best of luck.

Tuesday, September 01, 2009

Cupcake Congratulations

I haven't been making or blogging my papercrafts as much as I'd like as of late. So, I'm working on correcting that.

A friend of mine recently got engaged. I wanted to send her a card because it's what I do, but also because I remember how much I enjoyed the handful of engagement cards I received (hard to believe that was four years ago now).

My friend is an avid cupcake lover. I know that no matter what, I can't go wrong if her gifts/cards have cupcakes involved.

I used my Cricut to cut out the cupcake, and the shapes for the engagement ring. Instead of topping the cupcake with sprinkles or a cherry, I used the engagement ring.

The cupcake ribbon is from Michael's (I think the dollar bin a while back, it has a little sparkle to it). Then I used gel pens to decorate the engagement ring and to write the "congrats!" sentiment.

I'm really pleased with the way this card came out. It's simple and sweet, and I think it works well for the occasion.

Monday, June 29, 2009

Inspiration from NYC

Christyn, of Bead Up, does wonderful posts where she shares the inspiration behind some of her pieces. I love those posts and they make me think about where my inspiration comes from.

Truth be told, more often then not I am inspired by what materials I have on hand. Sometimes the inspiration comes from the person who'll be receiving the card or the mood that I am in. All of these things are a little difficult to showcase.

Last weekend, my husband and I took a trip into NYC to see a show and visit a museum. I've been to NYC a number of times, but it never ceases to capture my imagination. Once, on a trip, I was ruthlessly teased for whipping out my camera at every available opportunity. After my local tour guide (a friend) realized I wasn't taking the typical "tourist" pictures, he eased up.

After returning home from our trip, I was inspired by some of the things I saw there and began working on some overdue thank you cards.
While in NYC I visited FAO Schwarz. I am a Barbie collector and FAO is one of the few stores that I can actually see an upscale doll in person before making a purchase (their selection is limited, and typically a little overpriced). A silkstone doll came home with me (she just hopped in my bag, I swear I don't know how it happened), and when I took a look at the inside of the box I found inspiration to create one of my overdue thank you cards.

The card uses the same color scheme of ivory, gold, and a little black for the lettering. I used my Cricut to cut out the square shape. The phrase and gold corner details are stamped on. I went over the stamps with gel pens to enhance their look. The final touch was a little gold ribbon.
After pulling the tissue paper back to get a better look at my new doll, her swimsuit (inspired by the original Barbie's swimsuit back in 1959- yes, this is Barbie's 50th Anniversary!) was a definite inspiration. I love the simplicity of the swimsuit, and how the black and white really draw your eye.

I used the swimsuit and the turquoise pashmina I bought as inspiration for another long overdue thank you card. I used my Cuttlebug to emboss the flower design on the black paper. Then I went over the embossed design with white and turquoise gel pens. The quadrilateral shape was cut out using my Cricut. Thank you was stamped and then enhanced using my gel pens.
Hopefully, in the future I can do more posts like this, where I can share the source of my inspiration. The trick will be remembering to snap a photo of the inspiration before it's too late.
Where do you get your inspiration?

Friday, March 27, 2009

Birthday Cow


Birthday Cow
Originally uploaded by Cup O'Cake Designs
Waay back in November (I told you I'd try to catch you up on all I did while I took a haitus from blogging), a good friend of mine hired me to make her 24 cards (a mixture of Birthday, Thank You, and blank cards). I was beyond excited, and also a little overwhelmed.

When I make cards, I tend to either make them one at a time, or end up with a series of cards that all look similiar. I was a little nervous about being able to offer my client (I love that word, by the way!) a broad range of cards that she would be able to use. I wanted to make sure that there was a card in there for everyone on her list.

This card was one of the Birthday cards that I created. I have loved this cow stamp (part of an older Stampin' Up set) as long as I have had it, but I definitely have not used it enough in the past 8 years.

Even though the card includes flowers on the patterned paper (though, they could be sunbursts) and a ribbon, I still believe it is neutral enough to serve as a birthday card for men.

You can see some of the other 23 cards at my flickr.

Wednesday, November 12, 2008

Wilton Tool Caddy Decorated

I finally bought a tool caddy for all my cake decorating pieces. I decided to purchase the 50 piece Tool Caddy because I knew I could use the extra tips and other things that came with it.

If you click on the link above, you can see what the tool caddy looked like originally. I liked the colors, but I wanted my caddy to be a little more personal. I'm the only person in my class with this particular caddy- but there are several people in class with the same caddy and I'd hate to get mine confused sometime.

So, I purchased some vinyl for my Cricut and sat down to think about what I wanted to put on my caddy. Of course, my first thought was: Cupcakes! I put two cupcakes on the lid of the caddy and one on each side- but then when I looked at the caddy the front seemed empty. Since I'd only purchased two colors of vinyl I had to come up with another design for the front.

Even though the flowers were kind of an afterthought, I love the way they turned out. I also put my name on the back of the caddy. Just in case there's any question as to who it belongs to.


Wednesday, October 15, 2008

Thanks So Much


Another thank you card that was made for my Aunt, Uncle, & Cousin. They sent me some very cute stationary and a nice Starbucks gift card.

I used my Cricut to cut out the smaller square, and then stamped the sentiment on it. Then the yellow background went through the Cuttlebug to give it some texture.

A simple, yet very beautiful card.

Thanks a Million!

I've been on vacation for the past week, but I'm back now and back to posting on a regular basis.

I made this thank you card for my parents, to thank them for my birthday gifts. They sent me more crafting stuff than I would have imagined could fit into a box that size. Thank you Mom & Pa! (I know you read this blog.)

I used one of the Cuttlebug folders they gave me on this card for the background, and then used a new stamp set for the burgler and sentiment. I stamped both onto shapes that were cut out using my Cricut.

I couldn't find my gel pens, so I used crayons to color in the burgler.

I finished off the card by using my Paper punch on the corners.

Tuesday, September 23, 2008

Make a Wish (Birthday)

I made this card last week for a friend who had a birthday. It was inspired by a card over at the Pink Stamper.

I used my Cricut to cut out the cupcake as well as the squares. The squares are put on the card using pop dots for dimension. I used a gel pen for the sprinkles on the cupcake.

Two different colored papers are used for the background, with a ribbon pulling them together.

The sentiment in the upper left corner is stamped.

Wednesday, September 03, 2008

Too Cute

(click image to enlarge)

Another Baby card for another couple who is expecting. This time I knew it was a boy, so I felt more comfortable opting for a blue palette.

Tigger is cut using my Cricut. The sentiment is stamped and then gone over with a sparkly gel pen. Finally I added brads to the top, to draw the eye to the sentiment.

Still Together

(click image to enlarge)

I made this card last month for my parents' wedding anniversary.

I kept the card basic because I didn't have a lot of time to work with, and I just really wanted to do something simple.

I cut out the heart and the little couple with my Cricut. Drew on the accents with gel pens and then stamped the sentiment. The inside of the card is stamped with "After all these years!" To finish it off, I used my corner rounding punch.

Cute as a Button

(click image to enlarge)

I made this card for some friends who we recently found out are expecting. I had just gotten my new Pooh Font cartridge and really wanted to use it.

This little Pooh was too cute to pass up. Since I have no idea if the baby is a boy or a girl, I stuck with neutral colors. I just love that rich green color.

I used a corner punch to round the corners and added buttons to accent the stamped phrase. Although you can't see it in the photo, I used a gel pen for Pooh's tongue.

Monday, July 28, 2008

2 Scoops are better than 1

(click image to enlarge)

I made this card for a Jack & Jill party that my husband and I attended a few weeks ago. As a gift, we got an ice cream maker and recipe book so I wanted a card that went with the theme.

I cut out the ice cream cone with my Cricut. I cut it out twice, and used only the scoop from the second cut. I ran the ice cream scoops through my Cuttlebug to texturize them, so that they would stand out from one another.

I stamped the sentiment, and used my gel pens to accent the ice cream cone, as well as the stamps.

I used vellum as the outside of the card, and placed the ice cream cone on the right edge, cutting away the vellum so that the ice cream cone served as the very edge of the card.

Tuesday, July 08, 2008

Happy Birthday (7)

(click image to enlarge)

I made this card for my cousin who just turned 7. I wanted to highlight her age and use a theme that fit with the wrapping paper her gift was wrapped in.

All of the shapes were cut out with the Cricut. I used the wrapping paper to cut out the 7, and coordinating colors for the other dots on the card. I traced the cat's accents with gel pens and used google eyes to make the card a little more playful.

Congrats- Mortgage Burning

(click image to enlarge)
For the Mortgage party, I also made a sign. My Mom had made a set of fliers with photos and stories of the past 30 years at our house. This sign was the perfect addition to her display.

I used the Cricut to cut out the letters and the background. I also cut out a "mortgage" covered in flames, and a home that was stamped as "paid." I used glitter glue to accent certain portions of the sign.


Celebrate Centerpiece

(click image to enlarge)

I wanted to surprise my Mom for her Mortgage Burning Party, so I put together this paper centerpiece for her.

I used my Cricut to cut the flowers and shapes- including the word "celebrate" which I attached to the front of the pail.

Inside the pail is a piece of flower foam (the green kind that holds water and stems of flowers) to keep the pieces in place. I used cheap bamboo skewers (about $2 for a pack of 100) as "stems."

Thursday, June 26, 2008

Piece of Cake

(click image to enlarge)

My 2 year wedding anniversary was last week. Woo! I got my husband two tickets to see the New England Revolution in September. I didn't want to put the tickets in his card and I didn't have a box laying around the house that was small enough.

I used my Cricut to cut out the cake shaped box from Tags, Bags, Boxes & More. I cut it out as big as I could (given that I only have the original Cricut it was 5.5").

I was already planning to add a strip along the side of the cake to give the appearance of frosting in between layers, and coloring the top and back of the cake as well. In the end, I coated the frosting stripe in UTEE so that it would look shiny, and more like a ganache than a frosting. To top the cake I took tiny pieces of paper that I had torn up, and glued them on- to give the appearance of a chocolate shaving topping.

My husband had no idea what was in the box- and didn't even want to open it. It's still sitting at home (opened, very carefully) on display.

Monday, April 28, 2008

Faux iPhone

(click image to enlarge)

I spent a lot of time trying to get this one right. My husband's birthday was this past week and he'd been eying the iPhone for quite a while. Even though I'd decided to get him one, I knew he would have questions and I thought it would be better to have him there so he could also pick out a case.

I still wanted to give him something tangible to open- because unwrapping gifts is fun- so I decided to paper piece this faux iPhone.

I used my Cricut to cut out the phone base and all the squares for the icons. The hardest part was adding the detail to the icons. I was working off of this image. Given the size of the small squares and the pen tips, I think it came out pretty well.

Once we went and picked up the real phone, I compared the two. I was missing an icon square (it wasn't shown in the picture I used as a reference), and the proportions weren't exactly on. Overall, I think I did a great job.

Welcome Little One

(click image to enlarge)

This is a card I made for some friends who recently had their second child. I know people don't typically throw a big shower for second (or third) babies, but I thought it was a day worth celebrating.

I wanted to go with a nice girlie color scheme, but not too girlie. I'm not sure I achieved that exactly, but I loved the polka dots. I used my Cricut to cut out the bear. I used a gel pen to go over the mouth and make it stand out, and then added some fun google eyes.

The sentiment was stamped and then hand cut to resemble a flag. I went over the sentiment with a gel pen, to darken it.

I also did a simple weave in the upper left corner, in a small square, to give the card added dimension.

Minnie's Thinking of You

(click image to enlarge)

I made this card recently to send to my Aunt. I don't get to see her as often as I'd like and I wanted to remind her that I'm always thinking of her.

I used my Cricut to cut out Minnie. I love the Disney cartridges, but they are so tough to do on a small scale. I cut Minnie as big as I could, and still leave room on the card (and have the card fit in the envelope).

I hand cut the thought bubble, and stamped the sentiment. I went over the stamp with a gel pen. I also, cut around the dots by hand. It did not turn out as I had wanted it to, but live and learn.