(Sorry for the not great picture quality. I'm working on getting a photo editing program installed on my home computer.)
I've been majorly busy recently with a few close friends getting married, which has led to more time out of my house than I care to think about.
Last week, there were two birthdays at my husband's office. I have become the unofficial cupcake supplier when it comes to birthdays in his office.
For Monday's birthday celebrant, I made an old favorite: Mint Chocolate Chip Cupcakes. I had to improvise a bit and use finely ground candy canes instead of peppermint extract. Otherwise, it was a very routine day for baking.
Friday's birthday celebrant, however, was a bit more challenging. This coworker doesn't really care for cupcakes or cake. Luckily for me, by now most of my husband's office knows to expect cupcakes on their birthdays. That makes it much easier to figure out what kind of sweets to bake.
When I found out that the birthday celebrant liked peanut butter cookies, I was a little stumped. I must admit that I'm not really into peanut butter cookies. I checked around and find a nice simple recipe, with a twist. Dipping the cookies in chocolate.
I dipped half the cookies in chocolate (not knowing whether or not the birthday celebrant would want that), and then half of those went into sprinkles (for a festive look) and the other half into peanuts.
The cookies were a huge hit at the office. And, it's always nice to try something new.
Showing posts with label cookies. Show all posts
Showing posts with label cookies. Show all posts
Monday, August 17, 2009

Tuesday, June 09, 2009
I Can't Bake Without: OXO Good Grips Cookie Scoop
 Well, the move is progressing along nicely- and our kitchen is now completely unpacked. However, I have yet to bake anything in the new kitchen (hopefully that will happen this weekend). Combine that with the fact that all of my craft materials are still packed and chaotic, it's time for another segment of "Things I Can't Craft Without" but this time, it's a Baking Edition.
I see what you're thinking over there "yawn, a cookie scoop." But hold on dear readers, I'm here today to tell you that you can do more with a cookie scoop then just make drop cookies.
This is my cookie scoop, the OXO Good Grips Medium Sized Cookie Scoop. I bought it a few years back when I was making mounds of Holiday Cookies because I was tired of my lame attempts to make my cookies come out at about the same size. I settled on the medium, because the small was not going to cut it (I don't like tiny cookies) and the large was just...too big.
It works wonders on my drop cookies, but that shouldn't be a surprise as that is what it was created to do. I use it occasionally for rolled cookies, when I want a nice uniform look, because I don't trust myself to roll 2 dozen cookies in the same size.
Ok, ok, I hear you out there "so why should I not be yawning at this entry again?"
Here it is....are you ready for it?
The best use ever for this cookie scoop is to make cupcakes. Yeah, you heard me, I said cupcakes.
People always ask me how I get my cupcakes so even- without a few random small or overly large cupcakes. This is my secret- I use my cookie scoop to put batter in the baking cups.
It's so much easier/cleaner then trying to pour the batter from my mixing bowl/measuring cup/ziploc bag.
A regular sized cupcake takes between 1.5 and 2 medium cookie scoops of batter. A Texas Cupcake (jumbo, large, whatever) takes probably closer to 3-4 scoops. My mini's take between 1 and 1.5 scoops. Some day, I will probably end up with both the small and large sized cookie scoops too.
If you aren't using a cookie scoop to make your cupcakes yet, get on it. I promise you will think it was the best idea since the invention of velcro.
Monday, March 23, 2009
The Cookie Monster
For my first weekend post-play, I wanted to make a more complicated cupcake. I had been thinking about cookie dough and chocolate chip cookies for a while, so it seemed like a good idea at the right time.
Originally, I was going to make the cupcakes look like Cookie Monster (if you read a lot about cupcakes on the internet, you've probably seen these already). However, I ran out of time so I went with something more Cookie Monster inspired.
I started with Martha's one bowl chocolate recipe as the base for the cupcakes. Each cupcake got a bit of semi-frozen cookie dough added in, pre-baking.
Unfortunately, something went wrong somewhere with this recipe. I think that I either overmixed the batter or the cookie dough wasn't frozen thoroughly. The cookie dough ended up baking pretty much into a little cookie and the chocolate cake did not rise nearly enough- so it ended up being dense instead of light and fluffy.
The frosting is a simple vanilla buttercream, tinted blue. I topped the cupcakes off with chocolate chips and chocolate chip cookies pieces.
Regardless of the issue with the cupcake batter, they still tasted quite good. I think I will try this again, with frozen cookie dough and a more watchful eye on the batter mixing.
Wednesday, September 03, 2008
Cookies & Cream Cupcakes
 (click image to enlarge)
Three weeks ago I purchased Hello, Cupcake! and I have been itching to use it. I didn't make anything from the book with this set of cupcakes, but I did use one of the techniques.
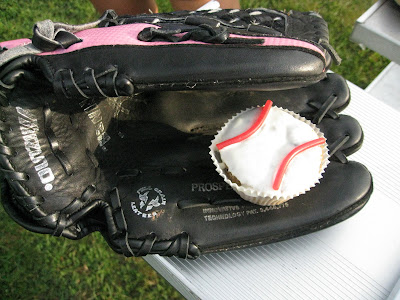
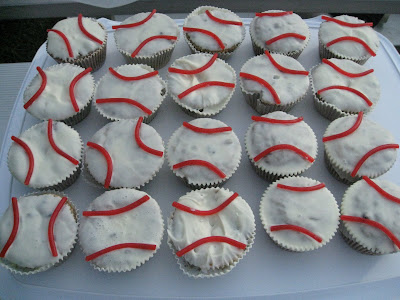
The recipe for these cupcakes came from the Cake Mix Doctor, as I saw it on How to Eat a Cupcake. The cupcakes were for the last softball game of the season (for my team) and earned great reviews.
Personally, I thought they were only ok. The recipe calls for Sour Cream, which I really hate. I swear I could taste the sour cream- my husband says I'm crazy. Next time, I think I'll try using vanilla yogurt instead.
Anyhow! The cupcakes have a half of an Oreo cookie baked on the bottom, and cookie crumbs baked throughout. They were super easy to make.
To frost the cupcakes I used store bought vanilla frosting which I melted for a few seconds (10 max) in the microwave. After melting the frosting, I dipped the cupcakes to coat them. Then I used Pull -n-Peel twizzlers cut to size for the "stitching" on the softballs.
Tuesday, March 04, 2008
Have a Drink
 (click image to enlarge)
I also made Martini shaped cookies for the Jewelry party. I like a little variety (at least in shapes, if not in flavors) in my cookies, and I know some people don't like candy on their cookies.
These were a little more challenging, because I couldn't really get the sugar sprinkles to spread the way I wanted them to. I wanted a more concentrated grouping towards the bottom of the "glass" with a lighter sprinkle at the top- simulating a fizzy martini. Sprinkles are like my nemisis. I love them (they're delicious and look fantastic), but I always have a hard time getting them to cooperate.
I was going to use the dragees here too, but again opted not to. I do think that next time I will put some food coloring in the royal icing (here used to pipe the outline of the martini glass) to have the color match the sprinkles.
Enough martinis to last me for days...

Give yourself a Hand
 (click image to enlarge)
I co-hosted a Jewelry party this weekend at my place. I wanted to come up with some fun and creative snacks. I love a good cheese and cracker plate as much as anyone, but since I love to bake I wanted to make something fun.
I saw these adorable hand cookies in a book (I'll find the source later), and thought they would be just perfect. The cookie cutter I got (from cookiecutter.com) was smaller than the size in the book, so I had to improvies a bit with the candies. I used Spice Drops (cut in half) for the rings and Hershey Mini Kissables for the bracelets. The candies were secured on the cookie using Royal Icing.
I want to get some dragees to use as accents, but unfortunately that did not happen in time. I don't think anyone noticed but me, as usual.

Wednesday, February 20, 2008
C is for Cookie!
 (click image to enlarge)
In case you haven't figured it out- I'm catching up on all my holiday craft postings now. Yes, that's right- in February. Heh.
I've been baking for a long time now and Christmas Cookies have always been a big tradition at my family's house. I decided this year to only make one batch because we are always traveling over the holidays and so the cookies sit around uneaten (poor lonely cookies).
I chose to make my Husband's favorites: Santa's Surprise. They are essentially peanut butter cookies with Snickers bars pieces inside. Yum. The one trick I have learned with these cookies is that you absolutely have to take them out of the oven before they brown too much. Just like chocolate chip cookies and sugar cookies, these continue to bake even after they're removed from the oven.
They may not look like much before baking, but after? Yum!

Subscribe to:
Posts (Atom)

